-
Seven years of Mastering Vim
Oh, how the time flies. I published the first edition of Mastering Vim in 2018. Since then, it has been translated to Japanese and received its second edition.


In 2021, I wrote about how much money publishing Mastering Vim has earned, and I think now’s the perfect time to get an update.
Mastering Vim was never meant to become a bestseller, but it did fairly well given the fact that I haven’t done much promotional work and haven’t been particularly active in Vim space since then.
For the first edition of the book, I receive 16% royalties. For the second edition, I negotiated a step-up based on publisher’s net receipts (over the lifetime of the book): it starts as low as 16% and climbs as high as 25% once the publisher nets £40,000 from my book.
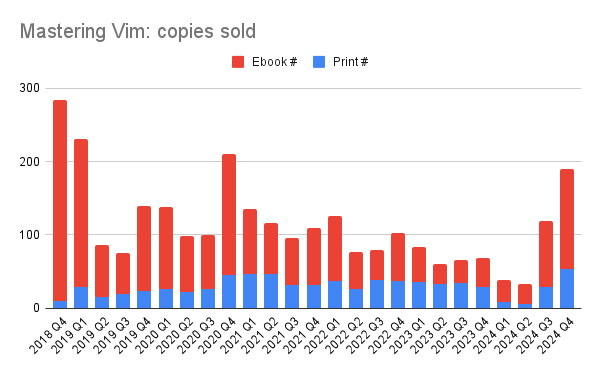
Here’s year over year sales and revenue data, you can see it to be predictable and steady:
Year Copies Revenue 2018 284* $363* 2019 533 $1,433 2020 548 $1,533 2021 458 $1,752 2022 386 $1,403 2023 279 $1,112 2024 381 $1,206 * Mastering Vim was published in Q4 2018.
On average, I earn about $5 for every print book sold, and a bit over $2 for every ebook sold.
In addition to book sales, I also receive a portion of translation fees (for the Japanese translation), as well as subscriptions to the publisher’s service (something I do not promote nor care about).
Book sales Translation fees Subscriptions $8,803 $1,669 $572 In the past seven years, Mastering Vim has sold close to 3,000 copies (not including the Japanese edition, which I have no visibility into). This has grossed slightly over $11,000 in total revenue. While this amount is definitely not enough to live off the royalty income, I have truly enjoyed learning more about the domain and becoming a subject matter expert throughout the writing process. Having a published book feels like a legacy artifact that I can be proud of. Of course, the quarterly royalty statements are a nice bonus as well.
If you’d like to see the book for yourself, Mastering Vim can be picked up on Amazon.
-
Tracking portfolio allocation
Financial independence is one of the core values in the Osipov household. We invest for the long term and maintain a stock-to-bond ratio that reflects our goals and risk tolerance. However, over time, the ratio gets out of date, and we use a handy spreadsheet to catch the imbalance and inform our adjustments.
It’s no secret that I love tinkering with spreadsheets: we keep a master spreadsheet which tracks our networth, income, expenses, mortgage, allocation, and any other little thing our heart desires. We perform a major annual financial review around New Year’s Eve, complete with presentations and champagne - it’s quite an event, and yes, we’re dorks. It’d be much harder to extract insights without diligent record-keeping throughout the year.
Each year we make a new copy of the spreadsheet, and we’re on 9th iteration at this point. Initially our spreadsheet was based on IndyPendent’s One Sheet to Rule Them All, but we’ve diverged quite a long time ago.
Here’s a screenshot of the sheet we use for tracking allocation within our portfolio and as a guide for occasional rebalancing (with some sample data filled in):
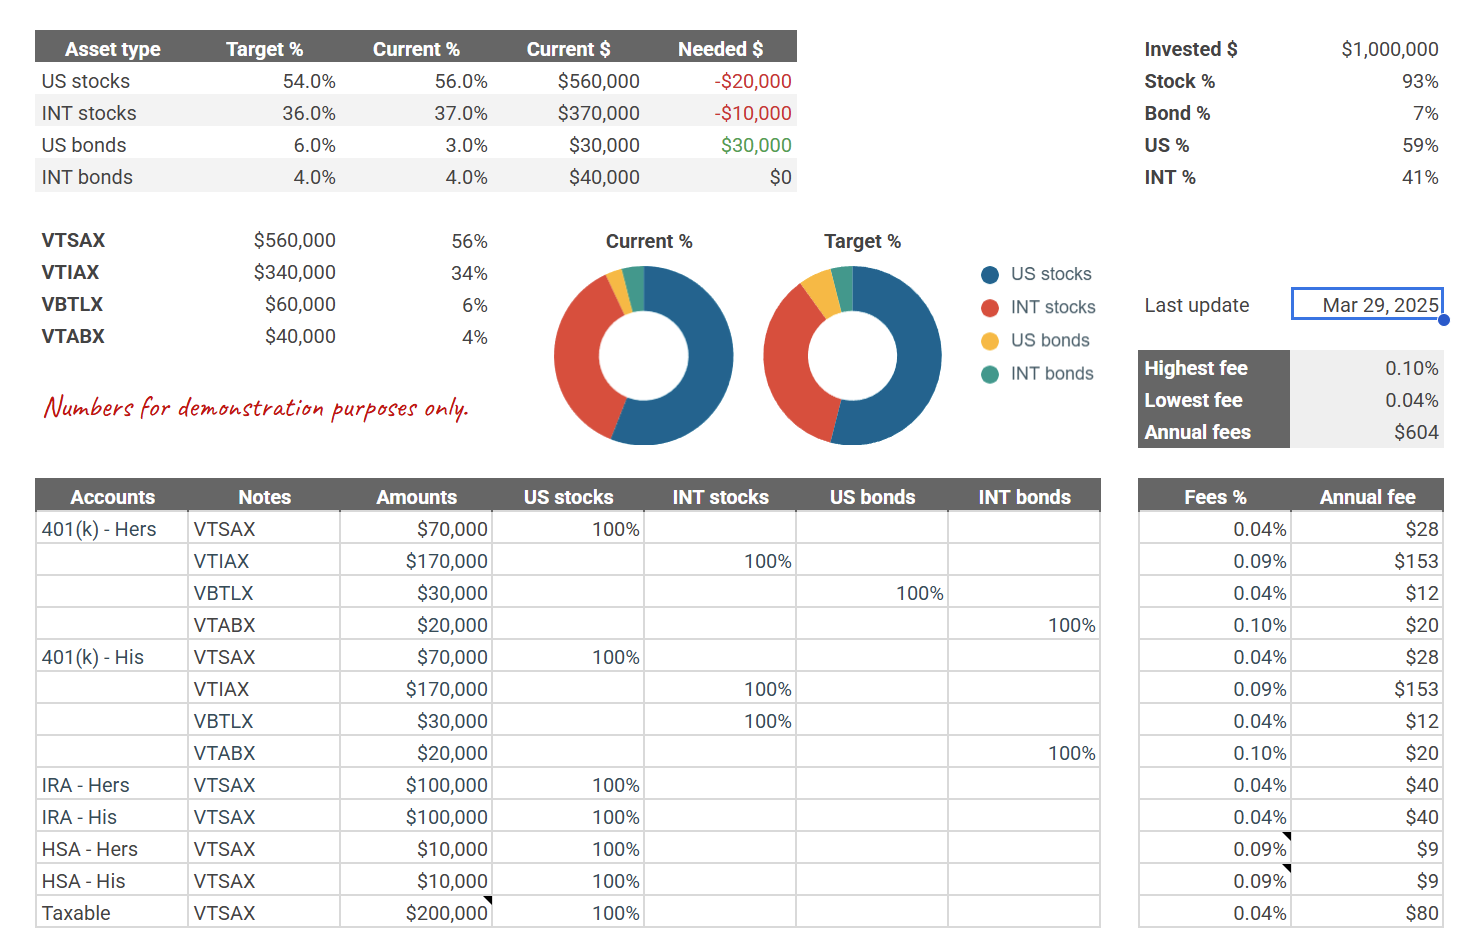
It allows me to set targets and see our current distributions: we care about stocks vs bonds split as well as US vs international market. It’s simple, manual, but has been working well for us. Over the years I tried more complex and “smart” solutions, but nothing beats this spreadsheet. Just like with our investment philosophy, simple truly is better than complex (thanks, PEP 20).
I extracted the allocation sheet from our mega-spreadsheet: feel free to copy Ruslan’s Allocation Sheet and tinker with it to your liking.
-
Second Edition of Mastering Vim
I haven’t posted on my blog in a while. Besides life getting in the way, most of the stack the site was built on has become obsolete and out of date. I couldn’t really do much without a major refresh, which I finally managed to complete a few days ago.
Now, for a belated announcement: I published the second edition of Mastering Vim (a little over 9 months ago)!
This edition features new (charming) illustrations, updated and improved code examples, and teaches you how to use Vim9script. I’ve also removed about 30 pages of unnecessary content from the first edition—I’m getting better at writing, after all! I believe the second edition of Mastering Vim is a fantastic introduction to Vim.
I’m also pleased to mention that this edition has been thoroughly edited by Christian Brabandt, a fitting successor as the lead of the Vim project after the passing of Bram Moolenaar, the original creator of Vim, in 2023.
If that sounds interesting, consider picking it up on Amazon (unfortunately your local bookstore is unlikely to stock one).
-
Back up your digital life
Our digital life increasingly exists primarily in the cloud. Documents, photos, emails, passwords: all of this resides in the cloud. And be it One Drive, iCloud, Google Drive, or Dropbox - you don’t really own any of it.
We trust these companies with our digital life and take their reliability for granted, but it’s worth remembering that nothing in this world is a guarantee. The likelihood of an outright failure of these services is relatively low; Google, for example, stores copies of all data in data centers across three geographic locations (often across multiple regions). Microsoft, Amazon, Apple and other giants follow equivalent policies. The real threat with this storage is bureaucracy. Your account can be erroneously flagged and banned: automated systems that constantly scan for policy violations aren’t perfect and can misfire. Your account can get hacked, even with a strong password and two factor authentication. Navigating account restore process and getting access back can take weeks, months, or be altogether impossible.
Because of this, local backups are critical if you care about your data - which you probably do.
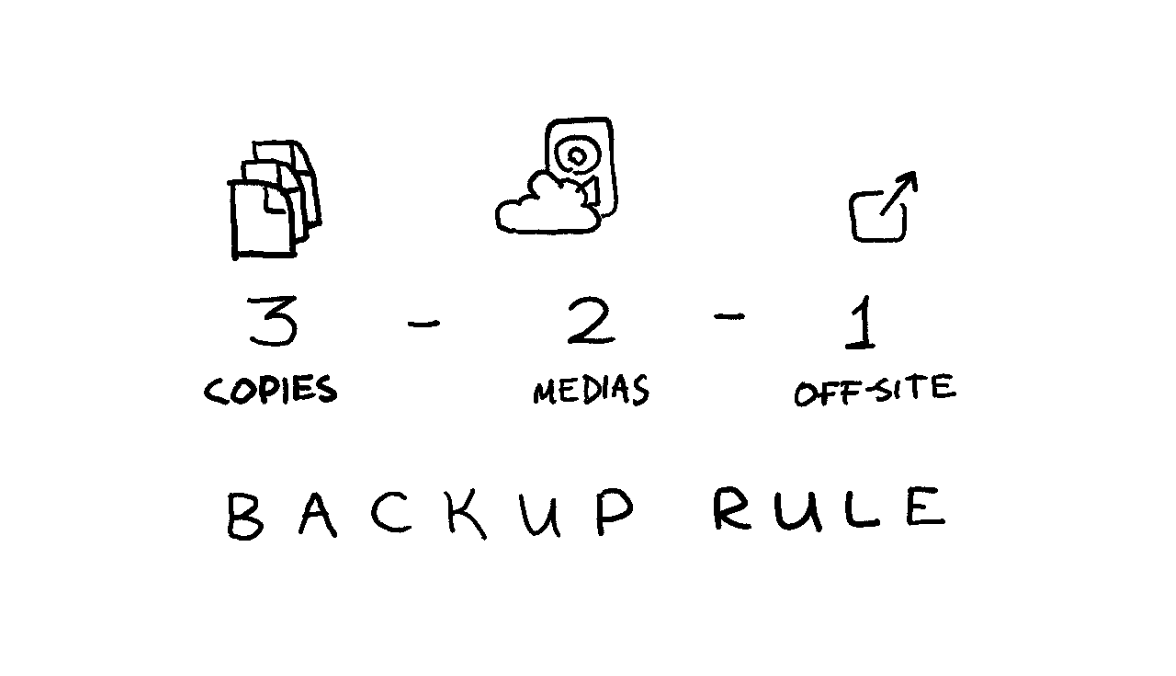
3-2-1 backup strategy
A common, straightforward, and widely used rule of data backups is referred to as the “3-2-1 rule”:
- Keep three copies of your data.
- Use two types of media for storage.
- Keep one copy off-site.
In fact, you’ll be hard-pressed to find a cloud service provider who doesn’t subscribe to some (likely more complex) variation of this rule.
We’ll satisfy the 3-2-1 backup rule with a dedicated backup drive and a home computer you likely already have:
- ✔️ Keep three copies of your data: (1) in the cloud, (2) on a dedicated backup drive, and (3) on a home device you already have.
- ✔️ Use two types of media for storage: (1) in the cloud, and (2) on our backup drive.
- ✔️ Keep one copy off-site: you’ll keep your backup drive at home, which is a different location from the cloud data centers.
Use an external HDD for backups
Solid state drives - SSDs - are all the rage today: they’re blazingly fast and have become relatively affordable. But you don’t want an SSD for a backup: SSDs reliability isn’t great when left unpowered: with the low end of failures occurring at merely the one-year mark. And since it’s a backup, you’ll want to leave it unpowered.
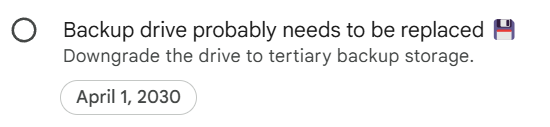
No, for this you’ll want a hard drive - an HDD. We’ll be trading read/write speed for reliability. External hard drives are affordable, don’t need to be powered to store the data, have been around for ages, and degrade more slowly. A quality hard drive should be mostly reliable for 5-7 years, and can be repurposed to a tertiary backup storage after that. Set a reminder in the future for yourself to do that.
Finally, some data can be recovered from a failed HDD, while failed SSDs are largely unrecoverable.
Survey your space needs, and use a hard drive a few times the size for scalability. I use a 4 Tb Seagate portable HDD, and it’s working just fine.
Use an existing device for tertiary storage
You likely already have some devices you could use at home. Maybe a laptop you’re currently using, or an old desktop tower you haven’t plugged in for years. Using this device will help ensure reliability and longevity of your data.
If you don’t have anything you can use, or your existing storage is too small - violating the 3-2-1 backup rule is better than having no backup at all. Use an external HDD, which you can downgrade to tertiary storage once you replace it in 5-7 years.
On encryption
Encrypting or not encrypting your backups is a personal choice.
You’ll likely be backing up important documents, which makes encryption critical for security. If the backup gets stolen, your whole life can be turned upside down (although this possibility still exists today if someone hacks into your cloud account).
However, because backups tend to live a long time, encryption can have downsides: tools can change, and most importantly you can forget your password. You also can’t decrypt a partially recovered backup: it’s all or nothing.
If you choose to encrypt, consider using established and mature open source encryption tooling like
gpg(I wrote about how to use GPG all the way back in 2012).It’s not all or nothing either: you can choose to only encrypt sensitive documents, but leave less sensitive media like photos, videos, or music unencrypted.
I do not encrypt my backups because I worry about forgetting my password by the time I need to recover the backup. I have a tendency to get in my own way: I couldn’t recover some writing I’ve backed up in 2012 because I couldn’t figure out what the password was. How fun.
Extracting data from Cloud
Internet giants allow you to download all your data in a fairly convenient manner. Google has Google Takeout, which lets you download data across services (Google Drive, Photos, email, etc). Apple allows you to request a copy of your data, and Microsoft allows you to submit a privacy request.
Don’t forget about other service providers who store your data like email providers or password managers.
Back up regularly
Set up a routine you’ll follow. For me, it’s every year. I won’t follow a more rigorous backup routine, and the trade-off of losing a year worth of data is worth the convenience of infrequent backups.
As our lives become more intertwined with the digital world, protecting your data is essential. By following the 3-2-1 backup strategy and using reliable storage, you can safeguard your data against unexpected mishaps. Regular backups and smart encryption choices will help keep your digital life secure and accessible. So, take a moment to set up your backups today - you’ll thank yourself later for the peace of mind that comes with knowing your data is safe.
-
Migrating from Octopress to Jekyll
Back in 2014 I abandoned WordPress for Octopress. It’s been especially amazing for page load speeds, and I also enjoyed the fact that GitHub Pages are completely free - and I only need to pay for a domain name. Hosting a website can get expensive.
Octopress was a shortlived framework built on top of Jekyll, focused on blogging and designed to run on top of GitHub Pages. Unfortunately the development stopped in 2015, and now, 10 years later, I couldn’t set it up on a new machine due to most dependencies getting dangerously out of date.
I chose to migrate to vanilla Jekyll, since it’s a static site generator which is built on top of simple markdown and HTML files. Jekyll’s been around for some time, and I’m hoping Microsoft won’t be shutting down GitHub pages any time soon.
The whole process only took a couple of hours, and I’d like to document some highlights and lowlights. You might find it useful if you’re setting up a new Jekyll blog, or, like me, still have an Octopress blog that needs migrating.
Fresh setup
I went with a fresh Jekyll setup, by installing Jekyll and running
jekyll new blog. I successfully copied over old_postsandimages, and ported the relevant parts of_config.ymlfrom Octopress to vanilla Jekyll.Octopress uses liquid
{% img %}tags, which aren’t natively supported in Jekyll. I took the opportunity to convert those to markdown style syntax. I only have a few hundred posts, and I used a Vim macro to convert all{% img /foo/bar.png baz %}to.By default Jekyll comes installed with the
minimatheme, which I found to be mostly sufficient for my needs. I was able to override specific theme files by copying them from gem installation location to my blog directory and modifying them. Turned out to be straightforward and customizable. For example, I transferred the way Octopress pagination looks by modifying_layouts/home.html.For backward compatbility, I also had to move RSS feed to
/atom.xmlby modifying_config.yml:feed: path: /atom.xmlI could immediately run the site locally with
bundle exec jekyll serve --baseurl="".Missing functionality
Two major things were missing straight out of the box: archive and category pages.
I grew attached to my archive page, and recreating it only took a couple of minutes. All I had to do is add an
archive.markdownpage to the site’s root directory:--- layout: page title: Archive navbar: Archive permalink: /blog/archive/ --- {%- assign date_format = site.minima.date_format | default: "%b %-d, %Y" -%} <div> <ul> {% for post in site.posts %} {% capture this_year %}{{ post.date | date: "%Y" }}{% endcapture %} {% unless year == this_year %} {% assign year = this_year %} <h2 style="margin-top: 1em;">{{ year }}</h2> {% endunless %} <li> <a href="{{ root_url }}{{ post.url }}" itemprop="url">{{ post.title }}</a> <span class="text-muted">| 📅 {{ post.date | date: date_format }}</span> </li> {% endfor %} </ul> </div>Building category support turned out to be messier and more complicated. I didn’t want to write up a custom solution, and ended up with some technical debt I’ll probably have to address in the future (wink-wink, this will never happen).
I used
jekyll-category-pagesgem, which worked okay-ish. The instructions on field-theory/jekyll-category-pages are extensive and aren’t too difficult to follow - I appreciated not having to write my own category pages, but I had to:- Stop category pages from being automatically added to the navigation bar.
- Disable pagination on category pages, because for some reason it really didn’t work with
jekyll-category-pages.
I also added my own basic category index pages by creating
categories.markdown:--- layout: page title: Categories navbar: Categories permalink: /blog/categories/ --- {% assign category_names = "" | split: "" %} {% for category in site.categories %} {% assign category_names = category_names | push: category[0] %} {% endfor %} {% assign category_names = category_names | sort %} <div> <ul> {% for category in category_names %} <li> <a href="{{ root_url }}/{{ site.category_path }}/{{ category | slugify }}">{{ category }}</a> </li> {% endfor %} </ul> </div>GitHub Pages
While GitHub Pages documentation is extensive, getting Jekyll to work with GitHub Pages took longer than I’d like to admit. Specifically,
Gemfilegenerated by runningjekyll new blogmisleadingly tells you to comment away the latest version of thejekyllgem and instead use thegithub-pagesgem:# Happy Jekylling! gem "jekyll", "~> 4.4.1" # If you want to use GitHub Pages, remove the "gem "jekyll"" above and # uncomment the line below. To upgrade, run `bundle update github-pages`. # gem "github-pages", group: :jekyll_pluginsYou don’t want to do that, oh no. Because the default GitHub Pages gem is stuck in the past on the 3rd version of Jekyll (and at the time of writing we’re on version 4), which caused all kind of hidden problems - including the fact that my URL slugs silently weren’t getting generated right. I switched back on the
jekyllgem and set up a custom GitHub action to deploy the site:name: Deploy Jekyll site to Pages on: push: branches: ["master"] # Allows you to run this workflow manually from the Actions tab workflow_dispatch: permissions: contents: read pages: write id-token: write concurrency: group: "pages" cancel-in-progress: false jobs: # Build job build: runs-on: ubuntu-latest steps: - name: Checkout uses: actions/checkout@v4 - name: Setup Ruby # https://github.com/ruby/setup-ruby/releases/tag/v1.207.0 uses: ruby/setup-ruby@4a9ddd6f338a97768b8006bf671dfbad383215f4 with: ruby-version: '3.1' # Not needed with a .ruby-version file bundler-cache: true # runs 'bundle install' and caches installed gems automatically cache-version: 0 # Increment this number if you need to re-download cached gems - name: Setup Pages id: pages uses: actions/configure-pages@v5 - name: Build with Jekyll run: bundle exec jekyll build --baseurl "$" env: JEKYLL_ENV: production - name: Upload artifact uses: actions/upload-pages-artifact@v3 # Deployment job deploy: environment: name: github-pages url: $ runs-on: ubuntu-latest needs: build steps: - name: Deploy to GitHub Pages id: deployment uses: actions/deploy-pages@v4Don’t forget to set “Build and deployment source” to “GitHub pages” in the repository settings to actually use the action.
My Octopress blog was set up in a
sourceGit branch, and content was generated into themasterbranch. I wanted to change that to have the source in the master branch (the action above won’t work without that), and I was able to replace mymasterwithsourcewith the following set of commands:git checkout master git pull git checkout source git merge -s ours master --allow-unrelated-histories git checkout master git merge sourceWe merge the
masterbranch intosourceusingoursmerge strategy (effectively ignoring themasterbranch history), and then merge that back intomaster.Positive experience
All in all migrating to Jekyll has been a great experience, which is a testament to Jekyll community’s dedication to thorough documentation. Knowing that Jekyll is a mature, maintained, and documented project, and that GitHub Pages infrastructure is reliable and supported, provides a sense of stability. I hope this results in Jekyll and GitHub Pages becoming a (reasonably) future-proof platform for my blog. But let’s check back in in 10 years - see you in 2035?