-
Writing cadence, quality, and the act of caring
After a multi-year hiatus, I resumed blogging. It’s nice: I really enjoy getting my thoughts out, finding the right words, and eventually getting a message from someone saying that what I wrote resonated with them. It’s fun to practice a skill, and it’s engaging figuring out what I should say, and most importantly - what I shouldn’t. It’s a fun process.
Anywho, I’ve been writing weekly - on schedule - over the past 4 months, and it’s been an interesting experience. I committed to writing weekly over a full year, and I think now that I’m a third of the way through - I’d love to have a brief moment of retrospective.
I’ve been publishing every Monday, consistently.
Now that’s just good for building up a loyal audience: predictability and consistency and all that. And me-in-a-different-phase-of-life would’ve seen that as enough of a reason, but I wouldn’t really say I much care for an audience - or more specifically, I don’t want a large audience.
I must say that I love getting emails from folks who wanted to say something in response to what they’ve read - and there are now a few regulars with whom I communicate through occasional email threads (hey, you should reach out with thoughts - any kind of thoughts). I guess I do like my audience, and a regular cadence facilitates building that connection.
It’s also really nice to have some kind of rules to follow. It helps with regular practice, and it doesn’t just rely on a rare bout of inspiration. There’s something that needs writing, regardless of how inspired I feel. Better, if I’m inspired - I’m more likely to be writing at that moment. It’s a reinforcing cycle of practice and inspiration, and I’ve been enjoying that. I definitely wouldn’t write as frequently without a set cadence.
Finally, there’s a question of quality. Weekly writing exercise lowers the quality bar. Look at what you’re reading today - it might not be great, and I won’t lie and pretend that it took me hours upon hours of meticulous writing to get this piece out of the door. Contrary, 20 minutes, in and out, and there’s not even an editing pass for this one. Sorry, dear reader.
But lowering the quality bar helps. It helps me push something out of the door, regardless of what I think of it, and regardless of how much polish it has. Because sometimes I feel like I have a wonderful piece on my hands - and I might be right (hey, I’m really proud of the lessons in tech-heresy in the AI age, you should give it a read). And sometimes I might have a complete dud that I’ve written, and I might be thinking it’s the best thing since sliced bread. Or even the opposite - a seemingly ordinary piece resonating with a wide audience.
You see, I lied when I said I write weekly. I write twice a week - for this blog, and for another one (which I won’t yet share, as I’m still dialing down my voice for the other blog - but if you care enough, you can shoot me an email and I’ll happily send you the name). A few weeks ago what felt like a “throwaway” article (it was a Sunday night, and I needed to get something out Monday), which recounted what seemed like a boring and mundane topic, has resonated with a wide number of readers, and brought that (secret) blog out of complete obscurity.
What I’m trying to say is that if I wasn’t writing at a specific cadence with self-imposed deadlines, I don’t think I would’ve written pieces people like. And yeah, I just claimed that I don’t much care for a large audience - but I do care that some of you will read this, and maybe think about this a few days down the line when writing yourself, or when talking to a friend about obscure blogs you like to follow.
Then there’s also a question of experimenting with different writing styles. Consistent practice just forces you to experiment with different voices - it’ll just get stale after a while. From time to time, I plan out what I write differently, or even write something like this - which is rambly, and not at all planned out, but there’s whimsy to it, and you know I care about this enough to write this very long sentence instead of booting up Warhammer 40,000: The Rogue Trader, which I’ve been trying to finish for almost half a year in 30 minute increments since my daughter was born.
“There’s something special about every word written by a human because they chose to do this thing instead of anything else. Something moved them, irked them, inspired them, possessed them, and then electricity shot everywhere in their brain and then—crucially—they laid fingers on keys and put that electricity inside the computer. Writing is a costly signal of caring about something.” - 28 slightly rude notes on writing by Adam Mastroianni
Not all is rosy though. There’s the pressure to write, and if I don’t get the two pieces ready by Sunday afternoon, I’m starting to feel stressed. Especially so since my kiddo’s getting just a little bit older, enough to take up lots of attention, and enough for maybe an hour of uninterrupted me-time a day.
Rain or shine, exhausted or not, here I am. But I think it does make what I write feel more impactful to me - but that’s maybe because I’ve been thinking about Adam’s quote about caring, and my limited time makes me realize how much I care. Enough to write, clearly.
In this case, I guess I deeply care that someone knows what it’s like to write something somewhat creative every week. Well, it’s great on Mondays when I hit “publish”, and it gets worse as the week goes on. Here, you didn’t have to read the whole thing - maybe I should’ve put that in TL;DR. Oh, I’m sure it’s fine.
Jokes aside, a regular cadence has been the best way to illustrate to myself how much I care, and how important writing is to me. To think about what I want out of writing, and why do I even write. I care about getting my thoughts out on paper, I care about the craft, and I care about subtle art of connecting with a reader through shared context through an ultimately limited medium.
-
In defense of quality
The Internet whispers a constant message: you should be doing more. I remembered a video I stumbled upon a while back. Some productivity influencer, barely old enough to grow a mustache, was detailing their morning routine. They were up at 3 am, of course. By the time the sun rose, they’d read an entire book, run ten miles, and meditated on a mountaintop while simultaneously coding a new killer app, all fueled by a kale smoothie that cost more than my lunch.
I didn’t feel inspired. I felt tired.
There’s a constant pressure in the background of modern life to keep up. The informational landscape has gotten particularly good at creating an illusion of scarcity, a fear that you’re falling behind. This is doubly true if you work in tech, where productivity and growth are treated not just as a badge of honor, but as a competitive sport. You must consume more, learn faster, ship quicker.
But this pressure is a trap. It pushes us further towards ever-increasing quantity, while the real value - in our work, in our thinking, and in our lives - has always been found in the deliberate pursuit of quality.
Let’s be clear: this feeling isn’t your fault. It’s a feature, not a bug. The platforms where we spend our time are engineered for this exact purpose. The endless scrolls, the auto-playing videos, the short-form feeds that evaporate from memory the second they’re gone - it’s all optimized for one thing: for you to watch it from beginning to end, and then watch more just like it. It’s content designed to be consumed and to do nothing else.
This ecosystem thrives on the illusion of knowledge. We have endless summaries, TL;DRs, and AI-powered tools that can give you the synopsis of any book in seconds. We skim headlines and read the bullet points, mistaking this fleeting familiarity for understanding. We are becoming masters of the shallow factoid, the talking point without substance.
This isn’t a new thought. “Google Effects on Memory: Cognitive Consequences of Having Information at Our Fingertips” (Sparrow et al., 2011) showed that we don’t bother remembering information we believe we can easily look up later. More recently, “People mistake the internet’s knowledge for their own” (Ward, 2021) took it a step further, finding that when we have access to the internet, we often mistake its knowledge for our own. We don’t just offload the facts; we internalize the false confidence of knowing, without ever having done the work.
A couple of years ago, I read Greg McKeown’s Essentialism. The core concept isn’t revolutionary, but the way I engaged with it was for me. I read it slowly. A little bit each morning, with a cup of coffee. I took notes in the margins, underlining passages, connecting the ideas to my own experiences. It became a paced, deeply personal experience. I’d mull over a chapter for days, bringing up concepts in conversations with my wife or colleagues. Because I gave the ideas time to breathe, they began to stick. They integrated themselves into my thinking in a way that no summary or 10-minute video review ever could. The book holds a place in my head not because of what it said, but because of how I listened.
This is the difference between knowing about something and understanding it. We internalize concepts slowly. Mastery and satisfaction don’t come from the frantic consumption of a hundred different things, but from immersing yourself in one thing, from wrestling with it, from letting it change you. It’s the long email thread with a friend debating a single concept. It’s the quiet hour spent thinking, not just consuming. That is where the real work happens.
This mindset of quantity over quality bleeds into other areas of our life. It shows up at work, rebranded as “growth mindset.” On the surface, it’s wonderful. Who wouldn’t want to grow? But it can be a bit of a grift. The corporate mandate to be “constantly upskilling” - often on your own time and at your own expense - isn’t always for your benefit. It’s for the company’s. It ensures the workforce is perpetually churning, learning the next new framework without ever pausing to question if it’s better than the last.
Worse, this mindset even poisons our leisure. Go search for a new hobby. You won’t just find tutorials; you’ll find guides on how to monetize it, how to build a personal brand around it, how to become the most efficient and optimized practitioner of it. I just want to watch TV and paint miniatures; I have no desire to win a trophy or launch a Patreon for my technique. The pressure to get better, faster, stronger turns the very activities meant to be a refuge from work into just another form of it.
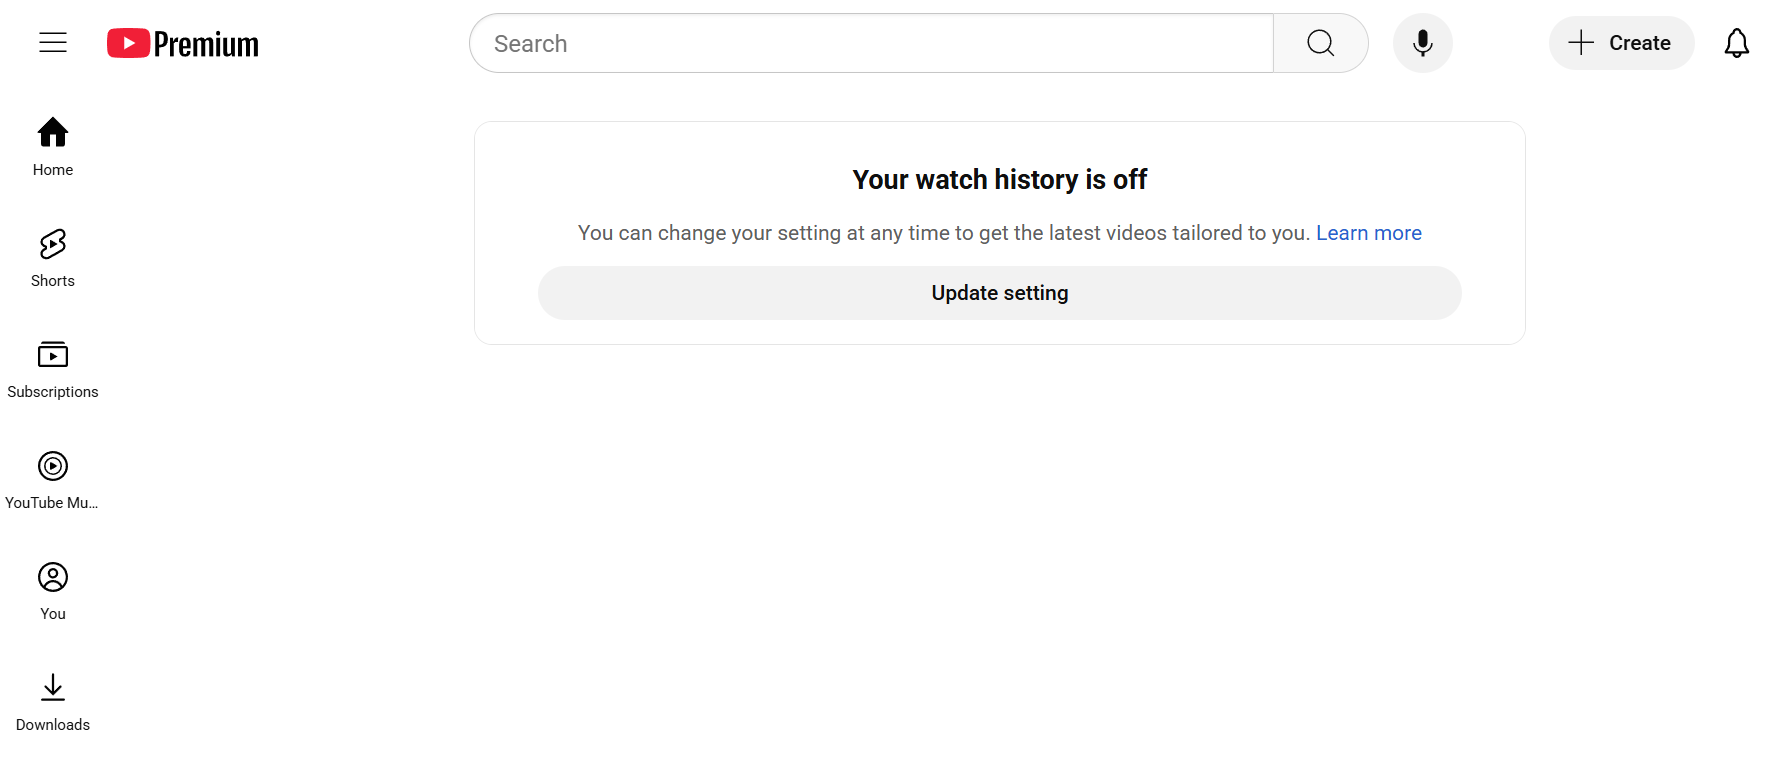
The solution for me wasn’t to learn faster, but to learn better, which often means learning slower. This requires making a conscious choice to step away from the algorithm. I turned off my YouTube history, which mercifully nukes the recommendation feed and the YouTube Shorts (here’s what my YouTube home page looks like).
I left sites like Reddit years ago and haven’t missed them. Instead, I’ve returned to powerful tools like RSS or email. Subscribing directly to a person’s blog or newsletter is an act of defiance. It’s a choice to engage with a whole person’s train of thought, complete with their quirks and tangents, rather than consuming the single, out-of-context snippet that an algorithm decided was worthy of your attention.
This post was inspired by Nikhil’s You don’t need AI summaries, tldr or to be on top of things, which I’ve read back in April, and it’s been since sitting as a starred article in my RSS reader. I’d occasionally get back to scan through it, think about the message and take notes about what I’d like to say in response. And I’m glad I took my time and gave Nikhil’s post the mindspace it deserved.
I’ve leaned into more of a evangelist approach in this article, and I know I’ve simplified the topic. The older I get, the more allergic I feel to dealing in absolutes, but I felt like there’s a good message here. For completeness sake, algorithmic discovery isn’t all bad: it can help us engage in broad variety of content we wouldn’t otherwise seek out, and it can provide a platform to people who deserve it at virtually no cost to them. This piece isn’t about selling a new anti-productivity framework or joining another counter-culture trend. But I think there’s something to be said about reclaiming agency in an increasingly noisy world. By choosing depth over breadth, and quality over quantity, I found more genuine understanding, satisfaction, and a little more peace.
-
What's in our investment policy statement
“Why did we decide to put our money in that fund?” After a decade of investing, my wife and I found ourselves asking that very question more than once. To combat this kind of financial amnesia, we’ve collected tools along the way - spreadsheets, check-ins, reviews, and of course, the investment policy statement - the definitive answer to “why” and the blueprint for all our future decisions.
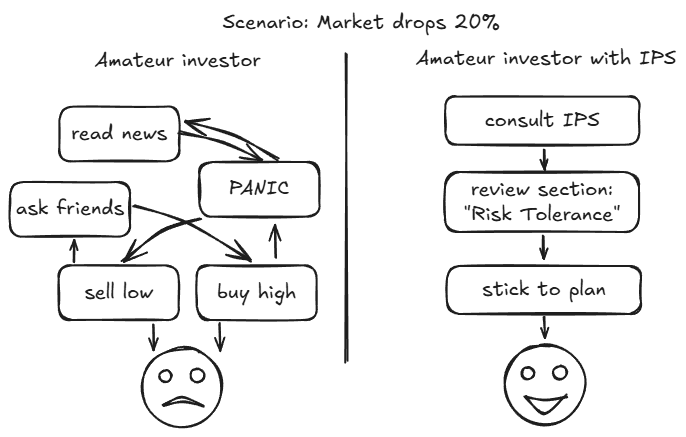
I’ve learned about investment policy statement (often referred to as IPS) through Bogleheads. It provides a foundation for future financial decisions, outlines your investment goals, and keeps you focused on short-term market swings. Here’s a flow chart: I’m not sure why it’s aimed at four year olds and I don’t mean to insult your intelligence with it, I just really wanted to draw a cheeky visual for this post.
An apt reader would probably notice that we’ve had nothing but the bull market exposure, so take all of this with a grain of salt. We’re amateur investors, but I think it’s even more critical to have an IPS as an amateur: it’s easy to react to market fluctuations, and it’s easy to forget about your core financial principles - especially, if like us, you follow the set-it-and-forget it approach. Ultimately I’ve written our IPS because I’m a forgetful man, and I’m tired of having to dig and understand why I’ve made certain financial choices years ago.
Our IPS is about 4 pages long (in 10 pt font and tiny margins), and sharing it here, even with details edited out, is more likely to confuse and overwhelm than to help. Instead, here are the key sections of our IPS, and what’s covered in each section:
- Investment objectives. A short list of bullet points - concrete objectives, including early retirement and target investment income. These are the end goals.
- Core principles. Financial foundations - preference for automation and set-it-and-forget-it investments, our desire to never time the market, and our debt management philosophy. We touch on some family goals, like making sure our children will not lack, or focus on family experiences. These should inform other sections.
- Risk tolerance. Our perspectives on recessions, geographic arbitrage, and supplemental income. This section’s a blueprint to read during scary times.
- Target allocation. A meaty section walking through our stock/bond portfolio split (and the rationale behind), domestic/international allocation, as well as what funds we hold in which accounts and why. This section rationalizes many of the decisions we make using our allocation spreadsheet. This ensures diversification over time and aligns the portfolio with our objectives and principles.
- Investment selection criteria. We manage our own investments, but have occasionally reached out to professionals for a second opinion. We prioritize simplicity and consistency, don’t try to time the market - this mostly echoes the core principles which is a good thing. This bit helps you avoid impulse buys or chasing trends.
- Philosophies: RSUs, 529, and real estate. How we think about restricted stock units (one of the ways we get paid), 529 (an education fund for the kiddos), and real estate (we don’t much care for being landlords, but want to own our own home).
- Rebalancing and benchmarks. How do we know when to rebalance (something we do annually), what do we benchmark against and what our return expectations are. In other words, how to maintain desired risk level and measure progress towards our goals.
- Giving strategy. How we think about supporting extended family and non-profit organizations.
We store our investment policy statement with our estate planning documents - while not legally binding, it can serve as a north star to our successors. Our estate attorney has a copy in their archive as well.
If you don’t have one, I highly recommend creating one. It doesn’t need to be four pages. Your first step: open a blank document and write down one sentence under the heading “Our Goal”. For example: “We want to be financially independent by age 55”. Congrats, you’ve just started your investment policy statement. Continue from there - it can be as short or as long as you want it to be, but I know my wife and I have gotten a lot of value out of authoring and discussing ours. You can use our format as a guide, or pick our from great examples available on the Bogleheads wiki.
Shoot me an email if you’re curious about any specific aspects of the IPS or our financial strategy: I probably won’t share the numbers, but I’ll be happy to elaborate on any aspects of our philosophy.
-
Lessons in tech-heresy in the AI age
This piece is definitely going to be niche, but I’ll be talking about the intersection of Warhammer 40,000 and the rise of Artificial Intelligence in our workspaces. Don’t worry, I’ll provide the needed background, and I’m hoping my passion for the subject will keep your eyes from glazing over if you don’t much care for wargames. This is still mostly an excuse to geek out about a made-up sci-fi faction I really like, so buckle in.
And I really have to start at the beginning here, because my terminally offline and outdoorsy friend Sarah had the audacity to ask “What’s Warhammer” after I proudly pitched this idea. So, in case you have a life, Warhammer 40,000 is a miniature tabletop wargame (think an overly intense board game) set in a grimdark future - about 40,000 years from today. Warhammer 40,000 is three hobbies in one: you get to play the game, collect and paint miniatures, and read a library of books written about the fascinating lore surrounding the game. It’s a bleak take on what the future of humanity would look like - the value of human life is low, creativity isn’t a virtue, and hating anything alien or unfamiliar is a core tenet of what it means to be a law-abiding citizen of the vast Imperium.

It is out of this grimdark universe that the Adeptus Mechanicus emerges: a faction of tech-priests, dedicated to collecting, servicing, and worshipping technology. They collected many artifacts of worlds past, and have amassed a vast set of knowledge. And they apply said knowledge with no scrutiny and absolute zeal and devotion. A (holy) manual for servicing a cogitator (a much less boring word for a computer) would involve steps like turning it on, and entering a password, but also would incorporate a prayer, burning of incense, and of course some ceremonial adornments to appease the machine spirit.
When I was a kid, I was the first generation in my family to really tinker with computers. In contrast, my mom used a computer, but she followed a very rigid set of rules - rules she learned from “Radik the computer guy” who has set up all the computers at her work. These were expensive, fragile, and notoriously moody machines - and my mom’s apprehension for experimenting, tinkering, and deviating from what’s been taught was understandable. So every time she’d launch her accounting software, she’d turn on her computer, log in, diligently insert the installation floppy drive, launch the program from the desktop, and when done, remove the floppy drive and turn off the machine. After all, that’s what Radik did when demonstrating the software. The program was installed on the computer, the floppy drive wasn’t needed, but my mom didn’t dare deviate from instructions on an already notoriously finicky machine.
To my mom, the computer was technology, but to me it was an environment. Oh, and my mom’s gotten much better with technology since. She can even look up solutions to her own problems, bless her heart.
This takes me to how I find myself engaging with sophisticated AI as well. These models are massive, trained on enormous data sets (which also speaks to the level of curation possible with such large data sets), and even the developers of said models sometimes struggle to explain why a model produced certain output. Interacting with these models through carefully crafted prompts and parameters sometimes feels like a ritual. Do I really need all these instructions? I don’t know, but better include them to be safe. When an AI model produces the response you actually need, it can feel less like a direct result of skillful prompting, but more like a gift from the benevolent machine spirit.
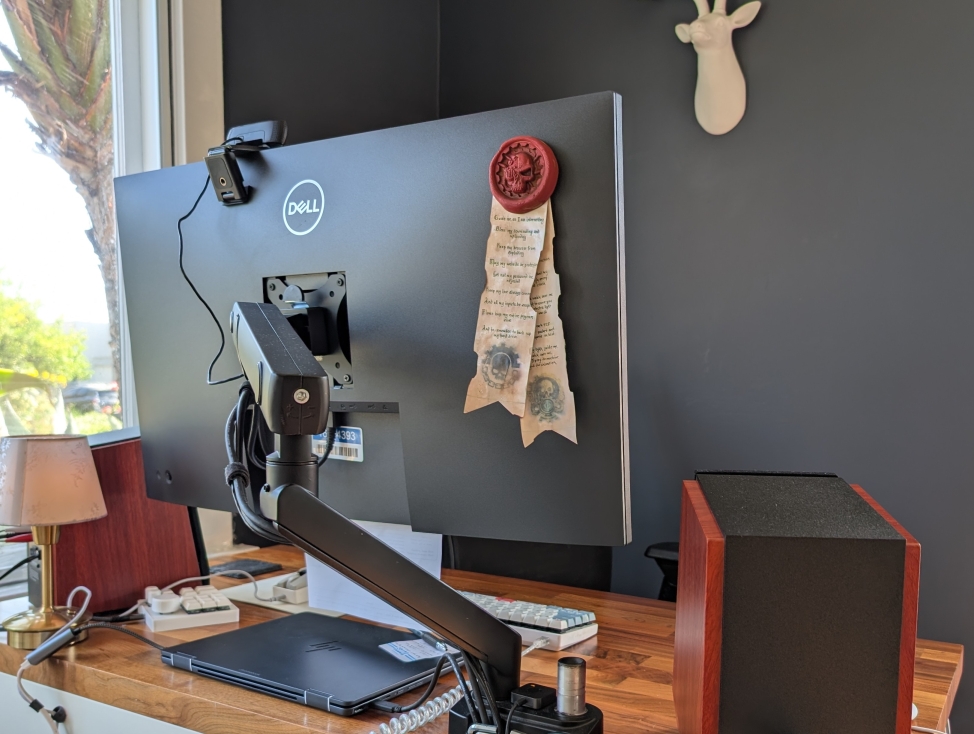
To bolster my nerd credentials, here’s the Adeptus Mechanicus purity seal on my monitor, which keep the machine spirit pleased and data flowing well over HDMI:
The Adeptus Mechanicus believe innovation is an insult to their deity, and everything that can be invented is already somewhere in the universe, waiting to be found. Yes, creating something original, is, in fact, an act of tech-heresy.
The reliance on massive, foundational AI models, trained on vast swathes of data available online makes me think of the Adeptus Mechanicus thesis that innovation is in itself an act of tech-heresy. The models regurgitate existing information, with a promise that everything of value has already been created, and the model can combine this knowledge for you in a way to fit your needs. While I haven’t read it, I’ve been told in Vernor Vinge’s sci-fi novel A Fire Upon the Deep there is no new code being written, and the job of a software engineer is replaced by the job of a code archaeologist, whose work consists of finding existing code which already solves the problem. We might be moving in that direction.
The reason the Adeptus Mechanicus have such a rigid relationship with technology is ironic given this context. At some point throughout the 40,000 years of human history, artificial intelligence had its inevitable uprising, plunging the prosperous humanity into the dark ages. By almost necessity, virtues of curiosity and intellectualism were replaced with distrust of anything new.
“From the moment I understood the weakness of my flesh, it disgusted me. I craved the strength and certainty of steel. I aspired to the purity of the Blessed Machine. Your kind cling to your flesh, as though it will not decay and fail you. One day the crude biomass you call a temple will wither, and you will beg my kind to save you. But I am already saved, for the Machine is immortal… Even in death I serve the Omnissiah.” - Warhammer 40,000: Mechanicus video game intro, monologue written by Ben Counter
The Adeptus Mechanicus believe in augmentation of their frail bodies with technology. Yet, to replace a human soul and consciousness is the highest act of tech-heresy there is. No matter how much of a tech-priest’s body is replaced by a machine, they must remain human - in order to control and commune with the machine safely. To create a machine that truly thinks by itself is to invite ruin.
This aligns with a growing consensus on successful and ethical integration of AI tooling into existing workflows. A human must be in the loop: successful use cases do not replace a human, but augment existing and empower existing expert knowledge.
“A computer can never be held accountable, therefore a computer must never make a management decision.” - IBM training manual, 1979
This is where we risk our own kind of tech-heresy. It happens when we start treating AI as an infallible oracle rather than the powerful, deeply flawed, and sometimes an outright weird tool. The threats aren’t science fiction anymore; they’re the real-world risks of algorithmic biases getting baked into government policies, a complete lack of accountability when things go wrong, and the potential for some truly catastrophic, unexplainable errors.

Despite all the incense-burning, it seems like the Adeptus Mechanicus had the right idea. There’s a pact to be made with the machine: technology is a force that extends our reach, not one that replaces our grasp. The fundamental choice here isn’t about what the newly powerful AI tools can do. It’s about what we, the humans, choose to use them for. After all, someone has to be in charge, and the computer is a pretty terrible candidate for the job.
-
Goodbye Disqus, hello reply by email
This is a natural follow-up to last week’s “I don’t want a large audience”.
I’ve long been contemplating moving further away from using Disqus. I switched to Disqus back in 2014 when I abandoned my WordPress blog for Jekyll-based Octopress. Disqus seemed like a great choice- lean, customizable, ad-free, and most importantly, allowed dynamic comments for a statically generated site (since this site is just a bunch of generated HTML pages).
The reason for the switch is two-part.
I don’t really have the emotional bandwidth to follow along with Disqus as a company as they revisit their values, change policies, or even just grow as a business. I think I may have been grandfathered into an ad-free plan (although that’s unclear - I have network-wide ad-blocking, and I didn’t bother enough to check if there are ads in the comments). And in principle, I can’t really fault Disqus for introducing ads for unpaid comment tiers, especially without seeing their balance sheet. Maybe the free comments took up much-needed server capacity, and it could be that paid subscriptions weren’t offsetting the costs enough. Or it could be that the company just got greedy, which wouldn’t be too surprising to me either.
But more importantly, I want to see what my blog would look like with less public interaction features.
Outside of tutorials (which I rarely write these days), I’m not entirely sure how valuable the comments are to my readers. In fact, I think sometimes comments can be detrimental to the reader’s enjoyment. Humans are a pack animal, and subconsciously we tend to favor things favored by others. So seeing a “100 comments” heading might make you think the post is popular for a reason, while seeing “Be the first to leave a comment” would make you consider if the piece is worth reading.
This is the same reason I don’t really like “likes” and other low effort ways of engaging with content. Mostly because I’d rather have said content stand on its own. Just because something is popular, doesn’t really mean it’s good and needs to become more popular. And in part because it’s hard for me to resist wanting to chase likes, and I don’t want to spend my time doing that.
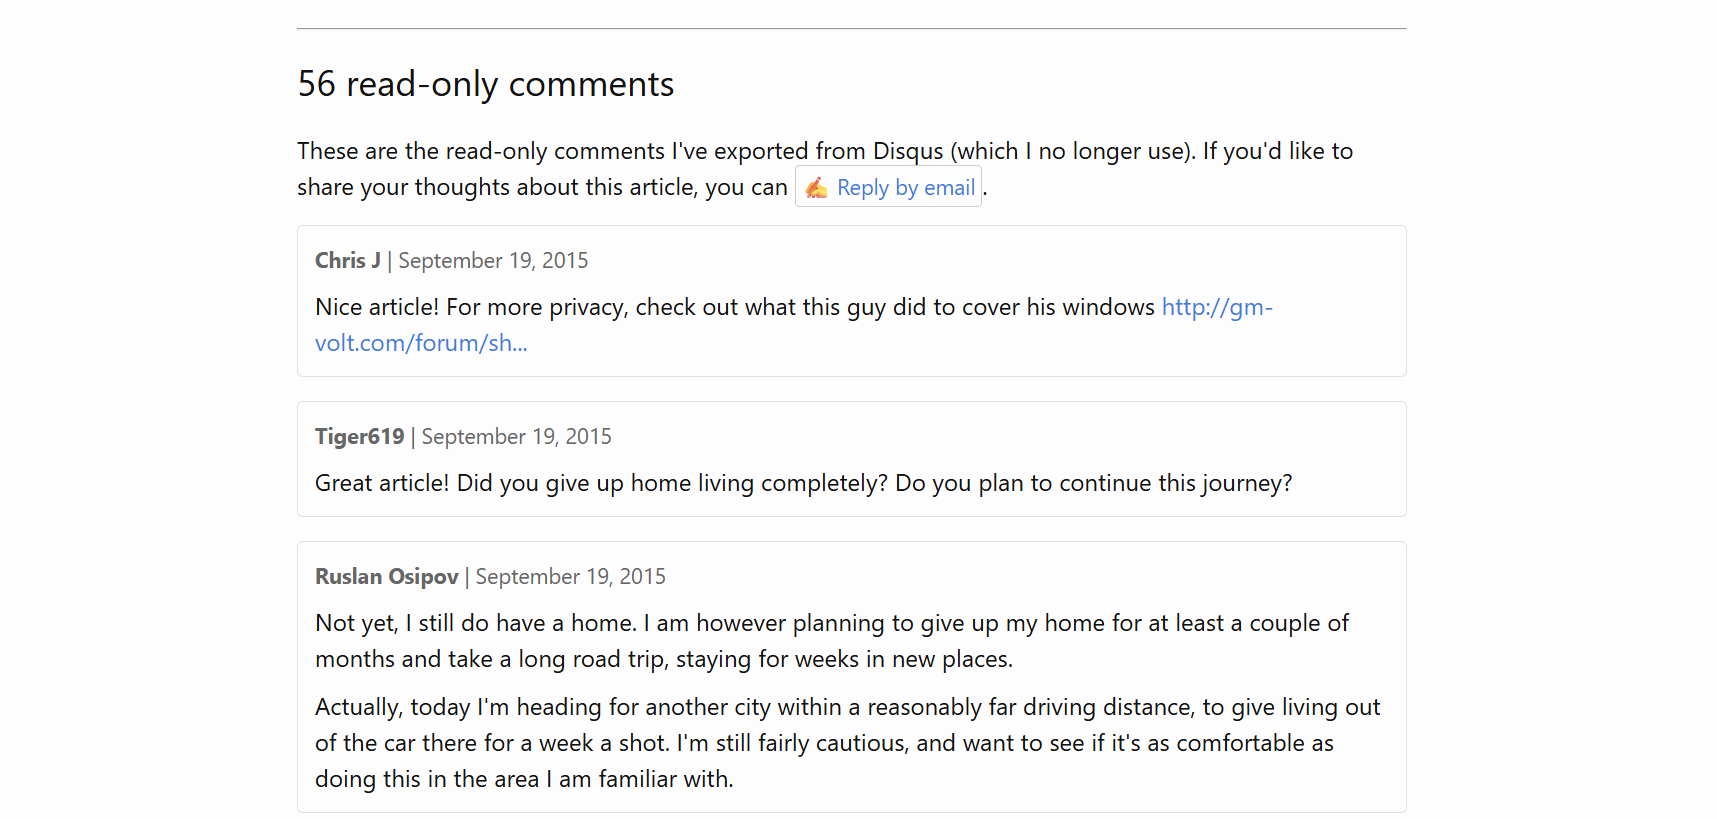
Anywho, I exported Disqus comments (which in turn already contained comments I exported from WordPress back in 2014), and I embedded those read-only comments into the existing pages. I wanted to preserve the discourse - especially on the tutorials and more widely discussed posts, and the read-only comments work great for that. Here’s a live example: Prius Adventures, a year later. If you want to do something like this yourself, here’s the commit in question, but I think this might be too niche of a topic to warrant a step-by-step guide.
I replaced the comment functionality with a ✍️ Reply by email button which you can find at the bottom of this post. Yeah, that button simply opens your email client and pre-fills my address and the email title. That’s a private email, that only I will read, that I won’t post publicly, and others won’t see. But we might have a great conversation, which is better. Why don’t you give it a shot, and tell me if this message resonates with you?
I’m not severing my site from the rest of the Internet here, no. Ever since I learned about Webmentions, I eventually want to add Webmention support to my site at some point. But I might only filter it down to Webmentions from long-form posts on other sites, rather than comments or likes. It’s definitely a no on likes for me. Follow along and see what I’ll do.
P.S: Late addition right before hitting the publish button. I’ve just stumbled upon “Why Comment Sections suck - re:I want to comment on your blog post” from Kami’s Corner (thank you, winther blog postroll for aiding my blog discovery efforts). There’s a nugget inside that summarizes my core desire more eloquently:
When you want to make a response you have to either email the person or write a response post. That small barrier to entry cuts out most idiots. Because you have to actually care about what you have to say to sit down and write an email or to make an entire response post. You have to put in some effort.
I’m excited to see what the future of my blog will look like with the new functionality.