-
I don't want a large audience
I’ve had this blog for 13 years now. I started it as a way to publish my programming journey, as I was learning C, Python, and tools like the command line or Vim. Since then, I’ve matured, both as a software engineer and as a person. Different things interest me these days. I’ve been managing engineers for some time and have things to say that I haven’t yet shared. I’ve also gotten into personal finance, traveled and lived out of my car for a year, and I’m even starting to enjoy engaging in the AI discourse. In the past couple of months, I’ve moved further towards subjective opinion pieces, which I enjoy greatly.
While my blog was never huge, I enjoyed my few thousand monthly users, most through organic search. This was primarily driven by the tutorial-like nature of my writing. Even when I would talk about my experience traveling the US in a Prius, I’d turn the article into a tutorial with step-by-step guides and tips.
After taking a little over a year of a break from writing, I’m back at it again. It was really the time afforded to me by my paternity leave that reminded me how much I like writing, and how much I enjoy others connecting with my writing. And now I don’t particularly care about wide viewership; I am more interested in the discourse, in the community.
A friend of mine, Patrick, started a newsletter after retiring. He sent a thought piece on AI to a humble private mailing list of 20 people. I think I was the only person who responded, but we’ve had some fantastic conversations. In fact, Patrick inspired me to write about AI, and even to pivot a small part of my role at Google to be defined by driving responsible AI adoption.
Since then, I’ve learned of new blog discovery mechanisms through communities like IndieWeb. I discovered my personal favorites like the winther blog or the uncountable thoughts. I even found some local San Diego bloggers on the chain, like Anthony Ciccarello, gRegor Morrill, or Joe Crawford. It’s been exciting to explore this new world of interconnected blogs.
It’s super engaging being able to connect with fellow bloggers. I can respond to their writing over email, get a thoughtful message, or even see a response to something I wrote on their own blog. I’m enjoying the quality local discourse and happy to be following local organic free-range fair trade blogs.
-
Category-specific RSS feeds in Jekyll
Chris Shaw asked me if I had category-specific RSS feeds on my site, and it felt like a perfectly reasonable request in the spirit of IndieWeb. This is a statically generated Jekyll site, and I couldn’t really find out-of-the box examples that worked exactly for my site.
Although, if you’re trying to kill two birds with one stone - that is to add categories and category feeds, you should use the jekyll-archives plugin, which seems to be capable of both generating the category pages, and category-specific RSS feeds.
I already have working and heavily customized categories through the unofficial jekyll-category-pages, and I needed a custom solution. This solution doesn’t rely on jekyll-category-pages though.
My Ruby skills are rusty, so I used Gemini Pro 2.5 to give me a hand with code generation. It took a couple of iterations, but the result is working fine.
First I added
_layouts/category_feed.xmlto create a layout:--- layout: null --- <?xml version="1.0" encoding="UTF-8"?> <rss version="2.0" xmlns:atom="http://www.w3.org/2005/Atom"> <channel> <title>{{ site.title | xml_escape }} - {{ page.category | xml_escape }}</title> <description>Recent posts in {{ page.category | xml_escape }} category on {{ site.title | xml_escape }}.</description> <link>{{ "/" | absolute_url }}</link> <atom:link href="{{ site.url }}{{ site.baseurl }}{{ page.url }}" rel="self" type="application/rss+xml" /> <pubDate>{{ site.time | date_to_rfc822 }}</pubDate> <lastBuildDate>{{ site.time | date_to_rfc822 }}</lastBuildDate> <generator>Jekyll v{{ jekyll.version }}</generator> {% for post in site.categories[page.category] %} <item> <title>{{ post.title | xml_escape }}</title> <description>{{ post.content | xml_escape }}</description> <pubDate>{{ post.date | date_to_rfc822 }}</pubDate> <link>{{ post.url | absolute_url }}</link> <guid isPermaLink="true">{{ post.url | absolute_url }}</guid> {% for tag in post.tags %} <category>{{ tag | xml_escape }}</category> {% endfor %} {% for cat in post.categories %} <category>{{ cat | xml_escape }}</category> {% endfor %} </item> {% endfor %} </channel> </rss>Then, I added
_plugins/category_feed_generator.rb(be sure to customize theblog/categoriespath to your liking):module Jekyll class CategoryFeedPage < Page def initialize(site, base, dir, category) @site = site @base = base @dir = dir @name = "#{Jekyll::Utils.slugify(category)}.xml" self.process(@name) self.read_yaml(File.join(base, '_layouts'), 'category_feed.xml') self.data['category'] = category end end class CategoryFeedGenerator < Generator safe true def generate(site) if site.layouts.key? 'category_feed' dir = 'blog/categories' site.categories.each_key do |category| site.pages << CategoryFeedPage.new(site, site.source, dir, category) end end end end endThis creates feeds like /blog/categories/programming.xml (or whatever URL you used).
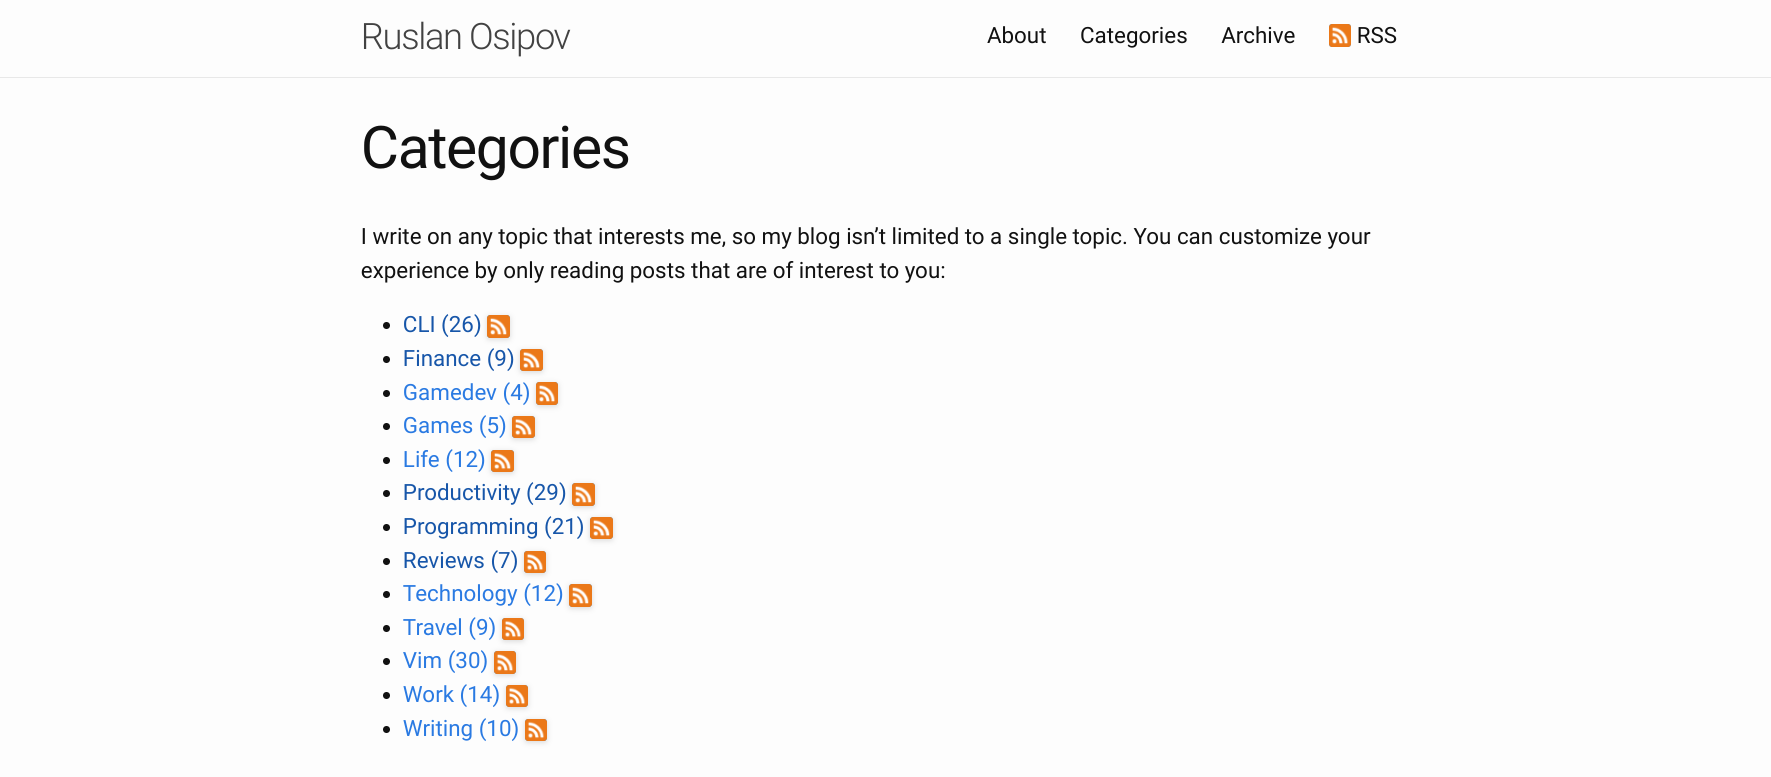
Finally, I added category specific links to the category listing pages and the category index (that part will be specific to how you choose to display your categories): RSS feed for Programming.
<a href="/blog/categories/programming.xml">RSS feed for Programming</a>You can see the full commit with the changes here. Happy Jekyll-ing!
-
I love bad coffee and hate algorithms
I love bad coffee.
One of the least sophisticated ways of making coffee is to just brew some in a pot and pour it into a cup. America’s famous for its bad coffee. When asking for a cup of coffee in, say, Amsterdam or Paris, you often get a nice, skillfully brewed cup of espresso – concentrated caffeinated artistry. The bouquet of flavour in such creations is something to admire, really.
And yet, every time I travel outside of the United States, I miss my average cup-of-Joe. When I first came to the United States, I would occasionally stop by at a diner that would serve terribly burnt coffee that was probably sitting in a coffee machine all day. That brew wasn’t delicate or even particularly potent: it was a straightforward, unapologetic part of the landscape. And that sense of Americana stuck with me. It brings me warmth, and slowly sipping my terrible cup of coffee is a highlight of my day. There’s an unpretentious honesty to it that I find increasingly rare.
It’s in this appreciation for the simple and unadorned that I find a contrast to a broader trend. In an increasingly interconnected world, it’s easy to focus on wanting the best, or appreciating what we’re told is the best. We learn about the “top” dining places, the “must-have” brand for a pair of pants, the “best” everything. This pressure isn’t new, but the mechanisms delivering these suggestions have become incredibly sophisticated. Now, we’re constantly nudged, particularly through our digital interfaces and by algorithmic suggestions, towards a curated, supposedly superior experience, often designed more for broad appeal or engagement metrics than personal resonance.
Choosing “bad” coffee, then, can feel like a small act of rebellion.
It’s a quiet refusal to have my preferences dictated, whether by a food critic offline or the mighty algorithm online. It’s easy to lose sight of what you genuinely like when you’re bombarded with content – perfectly filtered, endlessly optimized – telling you that something else is “better.” It might be objectively better by certain metrics, it probably is, but it isn’t necessarily better for me.
Yes, the cat video YouTube’s algorithm surfaces might be, by its engagement data, the “best” piece of cat-related content currently available. But often, it has no real relation to me, to the quirky humor of people I actually know, or the niche digital spaces I would consider mine. There’s no personal history there, no shared context, just an echo of mass appeal. It’s the digital equivalent of a focus-tested AAA movie – technically proficient, but lacking a soul.
That diner coffee isn’t aspiring to be anything other than what it is; it hasn’t been A/B tested or optimized for viral sharing. It’s a personal anchor in a sea of imposed “bests,” a tangible connection in an often-intangible world.
This isn’t a wholesale rejection of quality or a Luddite call to abandon our digital tools. It’s about recognizing that personal resonance often trumps algorithmic perfection. It’s about the freedom to find joy in the imperfect, the idiosyncratic, the things that speak to us for reasons that don’t require external validation or a high engagement score.
Sometimes, that wonderfully “bad” cup of coffee isn’t just a beverage; it’s a small declaration of independence from the tyranny of the curated feed. And that, in its own quiet, un-optimized way, is deeply satisfying.
-
AI and the new junior engineer
Being somewhat of an AI sceptic, but having to deal with the advent of AI tooling and its impact on engineering productivity is weird. As is often the case, the other day I was engaging in some AI fear mongering when chatting with my colleague Kate. We got into it, especially the concerns about the future of junior software engineer roles. She made a valid point that many other industries have already navigated significant shifts due to automation (Kate - you legend).
I thought about this before, but I’ve always dismissed the comparison due to the state AI tooling was in. Google practically forced all its engineers to use AI tooling far before it was ready, and many of us have burned out, and many of us have very strong opinions of how garbage this technology is. But over the past year alone we’re now at the point where AI models - with some guidance - can perform many junior development tasks - like putting together a simple website or writing a hyper specific tool. Oh, and shout-out to my then-manager-now-retired-friend Patrick - whose (exclusive, I am very fancy) newsletter encouraged me to dig into how AI tooling has changed. Thanks Patrick, I’ll probably send this to you.
In fact, Gemini Pro even helped me with an outline of this article. These are still my own thoughts, typed out with my own two hands (I find angrily typing out my thoughts to be therapeutic and the best part of writing). But there’s no writer’s block - I’m not staring at a blank document anymore. In front of me is a stub of an article that I hate with a passion, and this burning hatred for the AI-authored stub is what’s pushing me to write down my thoughts in one go.
You see, for a while I used to group AI with other tech trends like big data or blockchain - impactful technologies, but not something that fundamentally rewrote the playbook on software development. Yes, our databases are now order of magnitude larger, but we’re still using the same interfaces to engage with them - and it’s now just “data”. And blockchain, outside of niche problems, turned out to be a grift. No, AI is really closer to industrial revolution. And yeah, the news sources and many folks I know have been using these words have been saying this for years - but that just sounded too grandiose to be true. I couldn’t see the forest of changing job landscape for the trees of not-quite-yet mature models. But I think it’s true: the means of production will evolve.
Anyhow, Kate’s comments prompted me to look into how others adapted when their familiar landscapes changed.
The idea that “junior engineers won’t exist, so senior engineers won’t exist” has a simplistic appeal. However, it often overlooks how industries, and the people within them, actually progress. The software engineering career pipeline isn’t necessarily breaking - it’s just getting rerouted through unfamiliar territory.
Let’s be clear: the old model, where experience was often gained through highly repetitive tasks, was never perfect. It was simply the established way, the way of our ancestors: software engineers learn some math and not-particularly-useful concepts in college (or take a coding bootcamp, which is much faster, and in my experience, produces similar results), join a company, shadow more senior engineers, write some terrible code, make a few expensive mistakes for the company to absorb, and eventually graduate into productive developers of software. But like any system with inherent inefficiencies, this progression system was always susceptible to disruption.
This kind of transformation isn’t unique to software, and isn’t unique to AI. And in my brief research I found many examples - here are the three representative example - one where the career pathways evolved, one where that path was closed, and one where it became easier.
The factories
Let’s get the factory floor comparison out of the way - it’s not great, but it sort of works.. Getting to start in manufacturing meant working on an assembly line, performing a repetitive task hundreds of times a day, being noticed by the supervisor, and eventually being promoted up the chain. Throughout the later part of the twentieth century, industrial robots became a thing - these were big, dumb robots, but they could do what a worker did more consistently, sometimes faster, but most importantly - for a constant lower cost, and without sick days or unions.
The junior roles on the factory floor have changed - it’s now all about monitoring, maintaining, and troubleshooting the machines. Many jobs shifted from the factory floor to the office - you needed your CAD operators and technicians. The pathway to becoming a manufacturing professional is no longer about enduring years of menial back breaking labor: it’s all about understanding and interacting with automated systems.
The career ladder, while different, is still there for those who were willing to make the switch.
Opportunities aren’t better or worse - they’re just different.
Banking
Bank tellers. For a long time bank teller was a potential entry point into the world of finance. Learn the procedures, handle cash, advance through the branch, and move onto corporate. Then the ATMs were introduced in mid-twentieth century (in a moment of vulnerability I’d like to admit that I didn’t realize that ATM stands for Automated Teller Machine). The need for accepting and dispensing cash has diminished.
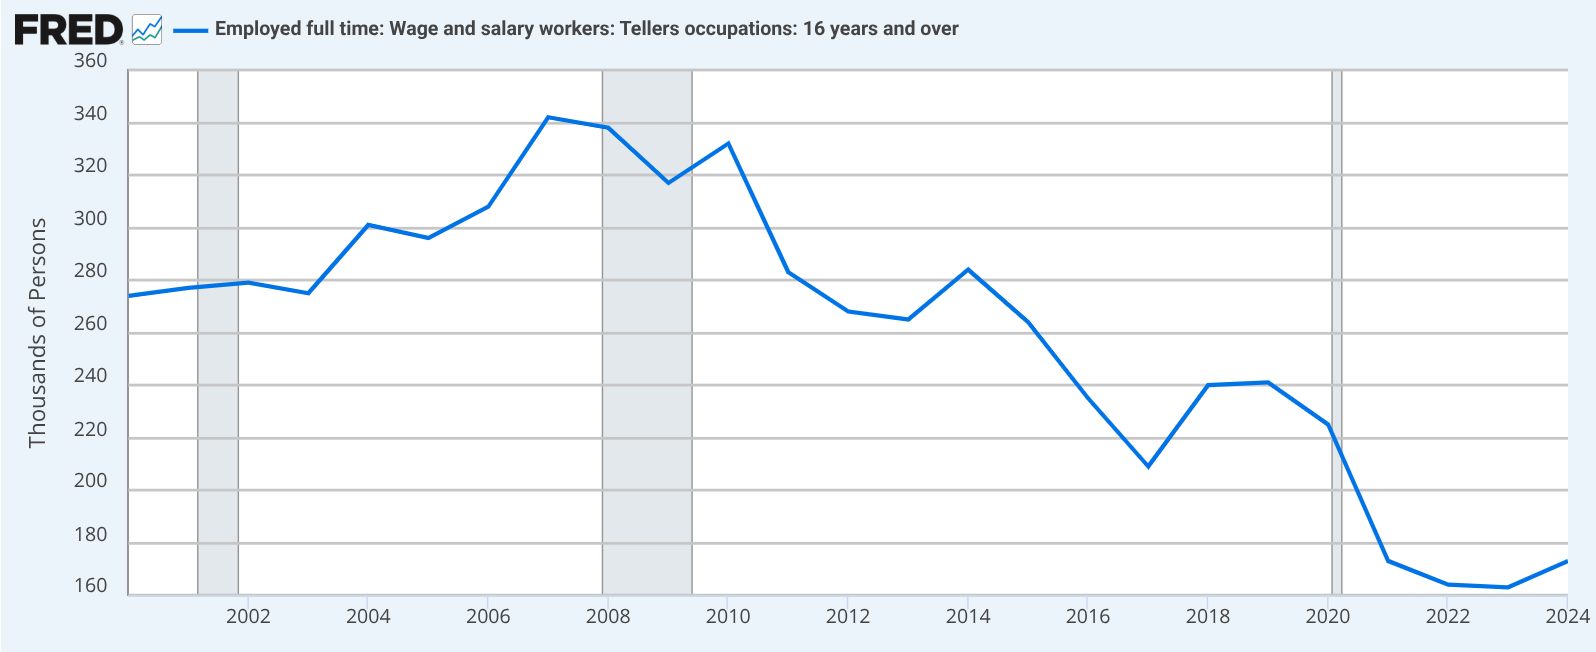
The teller jobs changed. It wasn’t about counting bills (and in fact, if you’ve been to a bank recently and interacted with a teller - they don’t really count the cash for you). The job didn’t die out, but is mostly about customer service and selling products for the bank.
With a change to teller’s role - now mostly of a customer service representative and a salesperson - a direct path from teller to a finance analyst is mostly no more. A finance degree and proficiency with financial software are what’s advantageous here, with the teller counter experience becoming irrelevant.
The door closes. Actually, the door’s been bricked up altogether.
Photography
Now for something that might have actually gotten better for folks trying to break in: photography. Ask your parents (or grandparents if you’re Gen Alpha) – about becoming a pro photographer pre-digital. It was a mission: you needed a darkroom, which meant space and a boatload of chemicals that probably weren’t doing your health any favors. Equipment cost an arm and a leg, film was pricey, and developing film was a whole other cost and skill. You’d need to wait hours or days to see if those expensive shots were any good. Apprenticeships were common because the barrier to entry, both in cost and arcane knowledge, was sky-high.
Then digital cameras, especially affordable DSLRs in the 2000s and eventually decent smartphone cameras changed the industry. Suddenly there’s no more darkroom alchemy - with Photoshop your house no longer smelled like a chemistry set. The learning loop shortened from hours or days to seconds: take a picture - look at the screen - delete - take another picture, and abundant online tutorials make learning free and accessible for all. S
Even distributing your work is easier - no longer do you need to contact a publisher or beg a gallery to look at your prints. Instagram, Flickr (is that still a thing?), and other photo sharing sites allow you to reach global audience in a few clicks. Yes, the market’s flooded, and everyone and their mother are a photographer now. Experts still do stand out in the sea of amateurs, although it’s definitely much harder to do so. But the pathway to learning the craft and getting the audience has been democratized.
Knowledge is widely accessible, and entry costs are significantly lowered.
A common pattern emerges: the mundane, the highly repetitive, the work that served as “experience building” largely through sheer volume – that’s what tends to get automated. And as a software engineering manager, that’s what I usually leverage junior engineers for. And that’s not setting them up for success - oh no it’s not.
So, what does this mean for software engineering, and what can we practically do?
Think about the evolution of programming itself. We moved from wrestling with machine code and assembly to C, where we gained more expressive power but still had to meticulously manage memory. Then came languages like Python or Java, which abstracted away much of that lower-level complexity, allowing us to build applications faster and focus on different, often higher-level, business problems. Each step didn’t eliminate the need for smart engineers; it changed the nature of the problems they focused on and the tools they used.
This AI transition feels like another such leap - albeit somewhat more dramatic - and there are more tech bros, and some of the NFT drifters have joined too. Which, combined with the costs and rough edges, makes it harder for some of us to see the value behind the technology. Yet, we’re getting a new set of incredibly powerful, high-level tools. The challenge isn’t that the work disappears, but that the valuable work shifts to orchestrating these tools, designing systems that incorporate them, and solving the new classes of problems that emerge at this higher level of abstraction.
If the common understanding of a junior software engineer is someone who primarily handles boilerplate code, fixes very basic bugs, or writes simple unit tests that could be script-generated, then yes, that specific type of role is likely to disappear. That work was more about human scripting than deep engineering.
The career path isn’t vanishing; it’s demanding different skills, often earlier.
For junior developers
Frankly, the advice for junior developers hasn’t really changed. Unlike Steve Yegge, I still think you should learn Vim though.
- Learn the tools: Your early-career work will increasingly involve interacting with AI-generated code, understanding its structure, integrating it, and debugging the subtle issues that arise. Developing effective prompts, validating AI outputs thoroughly, and fine-tuning models for specific tasks will be valuable skills. This is still foundational work, but it requires a different kind of critical engagement.
- Get good at learning: Tools and AI models will evolve quickly. The ability to teach yourself new paradigms efficiently is crucial. Focus on the underlying principles of software development; they tend to have a longer shelf life than specific tools.
- Develop scepticism: Don’t implicitly trust AI outputs. Your value will increasingly stem from your ability to critically evaluate, test, and verify what machines generate. Seek to understand why a tool produced a particular result.
- Practice: Theory is essential, but practical application is where deep learning occurs. Use these new AI tools to build something non-trivial. The challenges you encounter will be your best teachers.
- Tread with caution: Your senior peers might be sceptical of AI tooling. There’s a lot of hype, and senior developers have been through many hype cycles - I know I have. Show, don’t just tell, and be prepared to defend your (AI-assisted) work rigorously.
For senior engineers and managers
These are the steps my peers and I should be taking to set up those in our zone of influence for success.
- Adapt: Your role isn’t to shield junior colleagues from AI but to guide them in using these powerful tools effectively and ethically. This requires you to understand these tools well. Mentorship will likely focus more on system-level thinking in an AI-augmented environment.
- Re-evaluate skills: Consider how AI changes the value of certain traditional skills. Is deep expertise in a task that AI can now perform rapidly still the primary measure, or is the critical skill now defining problems effectively for AI and integrating its solutions? Your metrics for talent should adapt.
- Engage with tools: To lead this transition, you need firsthand experience with these tools. Understand their capabilities, limitations, and common failure modes. This practical knowledge is essential for making informed decisions and guiding your teams.
- Redesign tasks: Phase out giving juniors only the highly repetitive tasks that AI can now handle. Instead, structure initial assignments around using AI tools for leverage, then critically evaluating, testing, and integrating the results. Their first “wins” might be in successfully wrangling an AI to produce a useful component, then hardening it.
- Teach AI skepticism: Don’t assume junior developers will know how to question AI. Make it a core part of their training. Ask them to find the flaws in AI suggestions, to explain why an AI output is good or bad, not just that it “works.”
True engineering skill has always been about problem decomposition, understanding trade-offs, systems thinking, debugging complex interactions, and delivering value (to shareholders). AI doesn’t negate these fundamentals; it changes the context in which we apply them and the leverage available.
New engineers often lack deep context and the experience of seeing systems fail. AI won’t provide that - in fact it’ll make it harder to spot a lack of fundamental understanding.
The path to seniority won’t be about avoiding AI; it will be about learning to master it, question its outputs, and work strategically with it. It will require fostering critical thinking and deep systems knowledge to use these powerful tools wisely.
The old ways of gaining experience will not disappear - they will evolve. The challenge is to define what skill looks like in this new landscape and ensure our learning pathways effectively build it.
The future will need senior engineers; they will be the junior engineers of today who navigated evolving technological terrain and learned to harness its potential. It’s time to start mapping that new path.
-
Looking back on small web communities
Staying on the theme of nostalgia, I’d like to talk about small web communities. This post is a part of IndieWeb blog carnival - an alternative form of independent, personally curated content aggregation on a specific topic. I think that’s a pretty neat idea, a throwback in itself to how I used to discover cool stuff. This month’s carnival is hosted by Chris Shaw.
The fact that “small web communities” is a nostalgic topic for me should speak volumes about how I engage with the web today – or perhaps, how I don’t in the same way. But let me start at the beginning.
My relationship with web communities kicked off in the mid-2000s. I was probably in middle school, and while I’d had a computer for a while, the internet wasn’t yet a fixture in our home. That wasn’t a huge deal; my digital world mostly revolved around video games anyway.
Then came the cell phone era. Suddenly, every kid at school had one, and my mom, bless her, got me one too – and a smartphone at that! I think it was the Sony Ericsson K750. Man, that thing felt like a marvel of technology. It played music, snapped pictures with its (then impressive) 2-megapixel camera, and – get this – it had a web browser! I could actually browse the web using (very expensive, very slow) mobile data.

It was on that tiny 176x220 pixel display that I stumbled into my first real online community. A schoolmate showed me this internet forum specifically built for phones. It was a godsend: low data requirements, images disabled by default (a blessing for my GPRS connection!), and topics covering a vast array of subjects – including, crucially, video games and tabletop gaming!
I became a frequent poster. I dived into countless threads, argued passionately about silly things (like Diablo II not really being a role-playing game - “you don’t play a role”), and even played through forum-based role-playing games. Quite frankly, I’m impressed I didn’t graduate school with carpal tunnel from all that WAP browsing (that’s Wireless Apllication Protocol if you’re not familiar). The other posters were mostly teenagers too, and over time, a small tabletop gaming community formed around that forum. There were maybe 20 of us, tops. We lived in different cities, went to different schools, but we were connected by our shared love of tabletop gaming, forum-based RPGs, and the low bandwidth afforded by our phones.
There was genuine camaraderie, a lot of laughter (typed out, of course), and the occasional burst of teenage drama (I vividly remember employing some social engineering to obtain my “rival’s” password and writing profanities on their profile page). It felt real.
Closer to the end of the 2000s, things escalated. I finally got dial-up at home. I lived in a small town, and dial-up was still pretty common there (a good reminder that I didn’t grow up in the US, so the pace of internet adoption was a bit different).
I was also neck-deep in my rebellious teenager phase – blasting heavy metal, rocking a black jacket and steel-toed boots (an outfit my ever-supportive mother actually bought for me to encourage my “rebellion”). MySpace was the place to be around that time, and I’d diligently seek out other alternative-looking teenagers from my town, add them as friends, and then the real conversations would happen over ICQ.

For those not in the know, ICQ was huge. It was kind of AOL Messenger’s cooler, more international predecessor. AOL didn’t really take off in Russia, but ICQ went on strong for ages – until being acquired by VK in 2010 and finally shutting down in 2024, ceasing its operation after a whopping 28 years. Long live the king, indeed.
As an aside, thinking about ICQ makes me a bit wistful for the era of interoperable protocols. Remember Jabber/XMPP? Google Talk ran on it, and you could use various clients to connect to different services, including ICQ gateways. There was this sense that you weren’t locked into one company’s ecosystem. You could pick your client, connect to your network, and chat with people regardless of what specific app they were using, as long as it used the same protocol. It felt like the web was more open, more… connected in a federated way. We’ve lost a lot of that. Now, everything is a walled garden, and I can’t help but feel that this shift has made it harder for those little, cross-platform communities to organically form and thrive. Everyone retreated into their own digital fortresses.
I spent countless afternoons after school, evenings, and late nights glued to that computer screen, chatting about the events of the day, school gossip, music, and, naturally, gaming - both tabletop and video games. Some of my ICQ friends were from out of town, people I’d never met in person, but they still felt like real people, tangible individuals on the other side of the screen.
This brings me to VK (VKontakte), which really started to take off around that time in Russia, much like Facebook did elsewhere. These massive platforms were amazing in their own right – connecting everyone – but they also marked a shift. Suddenly, communication became centralized. Instead of seeking out niche forums or specific Jabber groups for your interests, you could just join a massive VK group with thousands, or even millions, of members.

It was convenient, sure. But something was lost. The intimacy of those smaller spaces started to fade. The signal-to-noise ratio went through the roof. While you could find more people, it became harder to find your people, or at least, to have the same kind of focused, tight-knit interactions. The algorithms started to decide what you saw, rather than the curated flow of a smaller, human-moderated community. It felt like the digital equivalent of a bustling, anonymous city replacing a cozy village. As I started using VK, I became connected with a lot more people, spent more time scrolling through algorithmic content, and the smaller forums I engaged in just sort of… faded out?
Despite this changing landscape, my journey into distinct online communities wasn’t completely over. Through someone I knew (no doubt from an ICQ chat), I discovered Space Station 13 – a game that really clicked with me. I dived headfirst into a close-knit Russian-speaking community for the game. I ended up becoming the custodian for the in-game wiki and eventually found myself heading up the server as a de-facto community leader. This was a noticeably larger community than my old forum haunts, with hundreds of active members, but the core crew of maybe 20-30 moderators and regulars maintained a very distinct (albeit, in retrospect, sometimes toxic) culture.
And again, the key thing was that each participant had their own personality – a distinct, real person on the other side of the screen. Some people were absolute good Samaritans, contributing to the wiki, the forum, or the server code. Others… well, others were notorious griefers who reveled in chaos. But they all felt like real people, because they were real people. Passionate, excited, sometimes infuriating, but undeniably real. There was drama around fudged moderator elections, complaints of hacking, tensions between role-players and munchkins… Yeah, real.
At some point, life happened. I moved to the US, my professional career started demanding more and more of my attention, and I gradually disengaged from the Space Station 13 community. I think this was around 2011-2013. I spent a number of years here focused on my career and professional growth, and frankly, I didn’t really engage with any specific internet communities for a while. My free digital time was mostly soaked up by solo experiences – video games and shows. Many, many hours were lost to the landscapes of Skyrim and the Cylons of Battlestar Galactica.
I did try to recapture some of that old magic. I remember joining a few local or interest-based IRC channels, hoping to find that spark. But the audience was always much, much older than I was at the time, or the vibe just wasn’t right, and I had a hard time connecting with people. I didn’t stick around for long in any of them.
Eventually, like so many others, I started using Reddit and YouTube more and more. I began relying on upvotes from massive, amorphous communities and the ever-present algorithms to introduce me to content. And for a long time, I didn’t really feel the need to engage with people as intimately online as I once had.
Real-world friendships, connections, and experiences had also, thankfully, taken center stage.
And then, relatively recently, as I was writing about my nostalgia for the old web, I discovered the IndieWeb. And something about it – its philosophy, its community, its focus on owning your own content and connecting on a more personal level – reignited that old desire to be part of a concrete, intentional online community. I’m excited about the idea of your personal website being a part of the larger network, heavily encouraging communicating with and actively hyperlinking to other sites.
I’m engaging in IndieWeb chat, I added my blog to the IndieWeb Webring, and, as of this submission, I’m participating in an IndieWeb blog carnival.
It feels like coming full circle, in a way.