Category: Productivity
-
Back up your digital life
Our digital life increasingly exists primarily in the cloud. Documents, photos, emails, passwords: all of this resides in the cloud. And be it One Drive, iCloud, Google Drive, or Dropbox - you don’t really own any of it.
We trust these companies with our digital life and take their reliability for granted, but it’s worth remembering that nothing in this world is a guarantee. The likelihood of an outright failure of these services is relatively low; Google, for example, stores copies of all data in data centers across three geographic locations (often across multiple regions). Microsoft, Amazon, Apple and other giants follow equivalent policies. The real threat with this storage is bureaucracy. Your account can be erroneously flagged and banned: automated systems that constantly scan for policy violations aren’t perfect and can misfire. Your account can get hacked, even with a strong password and two factor authentication. Navigating account restore process and getting access back can take weeks, months, or be altogether impossible.
Because of this, local backups are critical if you care about your data - which you probably do.
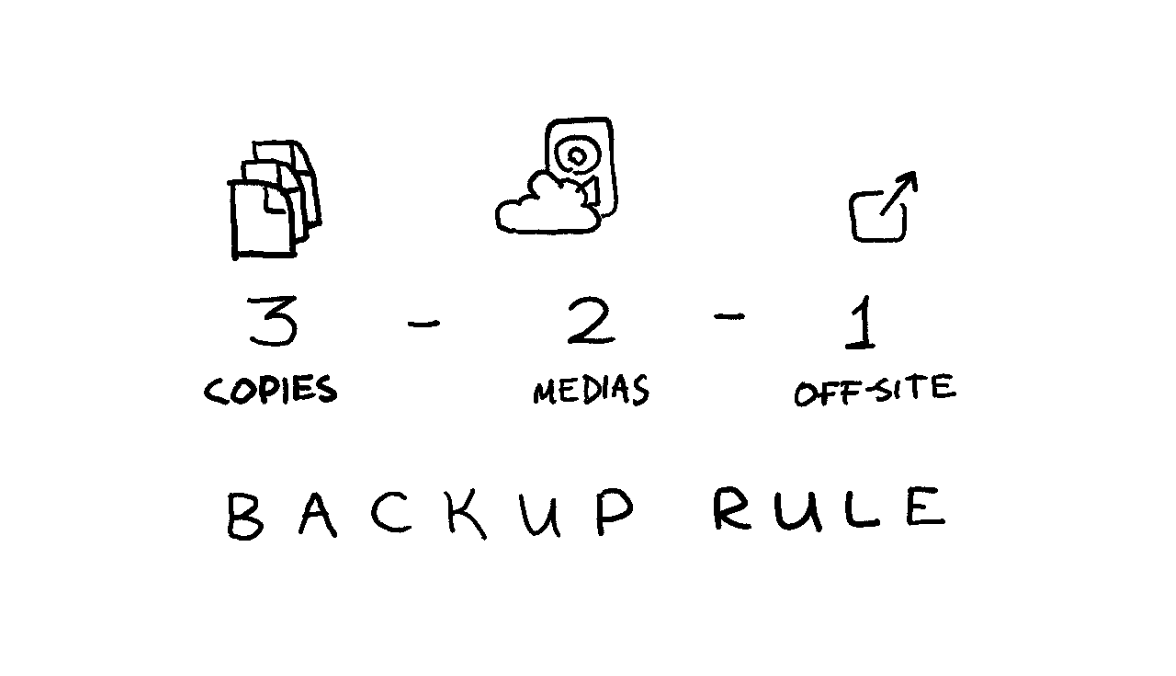
3-2-1 backup strategy
A common, straightforward, and widely used rule of data backups is referred to as the “3-2-1 rule”:
- Keep three copies of your data.
- Use two types of media for storage.
- Keep one copy off-site.
In fact, you’ll be hard-pressed to find a cloud service provider who doesn’t subscribe to some (likely more complex) variation of this rule.
We’ll satisfy the 3-2-1 backup rule with a dedicated backup drive and a home computer you likely already have:
- ✔️ Keep three copies of your data: (1) in the cloud, (2) on a dedicated backup drive, and (3) on a home device you already have.
- ✔️ Use two types of media for storage: (1) in the cloud, and (2) on our backup drive.
- ✔️ Keep one copy off-site: you’ll keep your backup drive at home, which is a different location from the cloud data centers.
Use an external HDD for backups
Solid state drives - SSDs - are all the rage today: they’re blazingly fast and have become relatively affordable. But you don’t want an SSD for a backup: SSDs reliability isn’t great when left unpowered: with the low end of failures occurring at merely the one-year mark. And since it’s a backup, you’ll want to leave it unpowered.
No, for this you’ll want a hard drive - an HDD. We’ll be trading read/write speed for reliability. External hard drives are affordable, don’t need to be powered to store the data, have been around for ages, and degrade more slowly. A quality hard drive should be mostly reliable for 5-7 years, and can be repurposed to a tertiary backup storage after that. Set a reminder in the future for yourself to do that.
Finally, some data can be recovered from a failed HDD, while failed SSDs are largely unrecoverable.
Survey your space needs, and use a hard drive a few times the size for scalability. I use a 4 Tb Seagate portable HDD, and it’s working just fine.
Use an existing device for tertiary storage
You likely already have some devices you could use at home. Maybe a laptop you’re currently using, or an old desktop tower you haven’t plugged in for years. Using this device will help ensure reliability and longevity of your data.
If you don’t have anything you can use, or your existing storage is too small - violating the 3-2-1 backup rule is better than having no backup at all. Use an external HDD, which you can downgrade to tertiary storage once you replace it in 5-7 years.
On encryption
Encrypting or not encrypting your backups is a personal choice.
You’ll likely be backing up important documents, which makes encryption critical for security. If the backup gets stolen, your whole life can be turned upside down (although this possibility still exists today if someone hacks into your cloud account).
However, because backups tend to live a long time, encryption can have downsides: tools can change, and most importantly you can forget your password. You also can’t decrypt a partially recovered backup: it’s all or nothing.
If you choose to encrypt, consider using established and mature open source encryption tooling like
gpg(I wrote about how to use GPG all the way back in 2012).It’s not all or nothing either: you can choose to only encrypt sensitive documents, but leave less sensitive media like photos, videos, or music unencrypted.
I do not encrypt my backups because I worry about forgetting my password by the time I need to recover the backup. I have a tendency to get in my own way: I couldn’t recover some writing I’ve backed up in 2012 because I couldn’t figure out what the password was. How fun.
Extracting data from Cloud
Internet giants allow you to download all your data in a fairly convenient manner. Google has Google Takeout, which lets you download data across services (Google Drive, Photos, email, etc). Apple allows you to request a copy of your data, and Microsoft allows you to submit a privacy request.
Don’t forget about other service providers who store your data like email providers or password managers.
Back up regularly
Set up a routine you’ll follow. For me, it’s every year. I won’t follow a more rigorous backup routine, and the trade-off of losing a year worth of data is worth the convenience of infrequent backups.
As our lives become more intertwined with the digital world, protecting your data is essential. By following the 3-2-1 backup strategy and using reliable storage, you can safeguard your data against unexpected mishaps. Regular backups and smart encryption choices will help keep your digital life secure and accessible. So, take a moment to set up your backups today - you’ll thank yourself later for the peace of mind that comes with knowing your data is safe.
-
Essentialism: A Practical Guide to Less
I’ve thoroughly enjoyed Essentialism, a book that encapsulates the simple yet powerful notion of “do fewer things, do them well.” There’s not much else to it. While this philosophy is straightforward, it’s the way Greg McKeown presents and reinforces this message that makes the book truly compelling.
Having Essentialism in physical form proved invaluable. I filled the margins with notes, worked through exercises alongside the text, and took the time to fully absorb the material as I progressed.
Essentialism is not a new concept, but the key takeaway is the author’s focus on truly internalizing the message. “Focus on things that matter, trim the excess” is a simple motto to remember, yet challenging to implement. Throughout my life, I’ve adopted many of essentialist practices in one form or another, from guarding my calendar to learning to say “no” to prioritizing essential projects. However, over time, clutter inevitably creeps in.
McKeown wisely focuses on routines that support the essentialist lifestyle, emphasizing the importance of dedicated time for reevaluation and recentering. He suggests establishing routines that prevent slipping into the frantic “onto the next thing” mentality so prevalent in the modern corporate world.
An analogy that particularly resonated with me is the closet metaphor. While you can declutter your closet once, it will eventually refill with clothes you don’t need. To keep your closet tidy, you need to have a regular time to reevauate your outfits, know where the nearest donation center is, how to get there, and what hours is it open. Similarly, McKeown provides methodologies to regularly reevaluate our priorities, supporting the rigorous process of regularly discarding the non-essential.
Essentialism extensively focuses on routines, practices, and exercises. The edition I read includes a “21-day Essentialism Challenge,” a helpful list of concrete activities corresponding to each chapter. While some prompts, like “take a nap” or “play with a child for 10 minutes” are a bit silly (where am I supposed to find a child on a Tuesday, Greg?), many steps effectively reinforce and integrate the material into your daily life, such as “design your ideal calendar,” “practice saying no gracefully,” or “schedule a personal offsite.”
The latter suggestion, scheduling a personal offsite, left a significant impression on me. It’s time dedicated to strategizing around your personal and professional goals. While I occasionally reflect on my career and life, McKeown elevates this practice into a ritual – a full day focused on self-reflection, planning, and deliberate action.
Essentialism is a helfpul book that prompts the reader to think about the routines one can put in place to change the way we approach life. It’s a reminder that less can indeed be more, and that by focusing on what truly matters, we can create a life of greater purpose, meaning, and fulfillment.
-
Thoughts, Energy, Attention
I find it easy to get caught up in whatever is on my mind. That’s why I find mindfulness practices particularly helpful, and T.E.A. - Thoughts, Energy, Attention - is something I’ve been using on and off for a few years to clear my head and focus on work and decisions that matter to me.

It’s short and simple, and only takes few minutes:
- Thoughts: What’s on my mind now?
- Is my train of thought helpful? What can be done to change it?
- Energy: How am I feeling?
- How is my energy level? Can I maintain or improve it?
- Attention: What matters to me?
- What should I focus on? What should I accomplish?
I’ve seen a common variation of the same acronym stand for Time, Energy, Attention - but I found that didn’t work well for me. Maybe that’s because I’m terrible at estimating or understanding time, or maybe that’s because the most important decisions sometimes end up not taking any time at all. Either way, I try not to concern myself with time. Hence: Thoughts, Energy, Attention.
You can read more about T.E.A. in this PDF from Google.
- Thoughts: What’s on my mind now?
-
The Eisenhower matrix
The Eisenhower matrix, sometimes known as the priority matrix, is an invaluable planning tool, and something I have been consistently using for the better part of the last decade.
As someone who has a short attention span and easily gets overwhelmed, I find Eisenhower matrix to be an invaluable tool in allowing me to focus on what’s important, rather than what’s right in front of me.
Oh, I still struggle to make sure that things that are important to me are what matters to others, but that’s a whole different battle - at the very least I’m able to keep my own head straight, and that’s a win in my book.
Without any further ado, I present to you the decision making framework developed and popularized by Dwight D. Eisenhower, the 34th president of the United States (and clearly a notorious efficiency nut).

It’s pretty simple, really. Take everything from your long single-file To-Do list, and place it on the matrix based on its urgency and importance. Work through the matrix in the following order:
- Urgent and important: get these done, now.
- Important, but not urgent: decide when you want to do these, actively make time for yourself to work on those.
- Urgent, but not important: delegate (read on below if you have no one to delegate to).
- Not urgent and not important: take time to eliminate these tasks.
Do now: a common pitfall
It’s easy to throw everything into the “urgent and important” pile. In reality, that’s not often the case. If you find yourself throwing everything in the first quadrant - I implore you to think of your tasks in relative terms. Out of everything on your mind, I’m sure some things are more important than others.
I find that over time most of my work shifts into a single quadrant (usually the “important, but not urgent”), and I find it helpful to redistribute those, or populate the matrix from scratch.
Schedule: mindful use of time
One of the goals of the Eisenhower Matrix is to increase visibility into how you spend your time. While it’s easy to spend most of the time in the “urgent and important” quadrant, the best work happens in the “important, but not urgent” section of the matrix. That’s where the best use of your time is, and that’s where most of the energy and attention should be spent.
Otherwise you’re just running around like a chicken with its head cut off, although I can sympathise with the difficulty of getting out of the urgency trap. It’s not trivial, and probably downright impossible in some cases.
This is where the biggest pitfall of the Eisenhower matrix lays in my experience. You want to maximize amount of time spent in the “schedule” quadrant, but you don’t want to end up with a massive list that becomes a yet another To Do list, because one dimensional To-Do lists suck.
Delegate: to whom?
Not everyone has someone to delegate work to. Or not everything can be delegated. In these cases, I treat the “delegate” bucket the same as “eliminate”. Hopefully that won’t come back to bite me in the future.
Eliminate: it’s hard
I really like following up on things, to a fault. I don’t like leaving loose ends, unanswered emails, or unspoken expectations. I find it helpful to schedule time to explicitly eliminate certain work, and communicate explicit expectations to everyone around me about that. Because of that, that’s where the most of my procrastination happens. Telling people “no” isn’t always easy, and I still don’t have the best process for combing through the “Eliminate” quadrant.
I know many people are a lot more comfortable letting unimportant things quietly fall through the cracks, and there’s nothing wrong with that.
-
High stakes email checklist
I’m making a little cheat sheet for myself. As I progress in my career, much of my work revolves around communication, and I’d be remiss if I don’t share a formal framework I use. I like checklists, spreadsheets, and anything else that organizes the world around me, and it’s fun to make one about communications.
Checklist
This is a checklist for high stakes emails, let’s dig in:
- Goals
- What are you trying to accomplish? Why? (It could be worth asking why multiple times.)
- Will this email help you accomplish the goal?
- Can the goal be summarized in a single sentence? If not, it’s probably not specific enough.
- Audience
- Who is the audience?
- What does the audience care about? How can you connect the subject of your email to things they care about?
- Does every recipient need to be there? Who’s missing?
- What action do you want the reader to take? Is there a clear call for action? For executive communications (who have notoriously short attention span), you’ll want to both start and end with the same call for action.
- Content
- Is there a nuance that would be lost in email that requires face to face conversation? Does this need to be an email?
- Does every sentence and paragraph support your goal?
- Does this need a TL;DR?
- Is the narrative structure in place? Is there a clear beginning, middle, and end? No need to write a novel, but without this the content risks being disjoined.
- Impulse
- Is now the best time to send it? Friday afternoon is almost always a no-no, unless you purposely want the reader to pay less attention to the issue.
- If this was shared broadly, would you rephrase it? If yes - you definitely
should.
- To double down, if email is about someone, write as if that someone will eventually see it. It’s fine to be candid, it’s not fine to be rude.
- Are you angry? Upset? I get notoriously cranky in the late afternoon, and avoid sending anything important until the next day - or, if time sensitive, until taking a short break or a walk.
Example
Let’s apply this to an example. Say, I’m writing a book, and the editor I’m working with hasn’t been responsive. I’ve tried talking to them about it, but they’re not responsive. I think it’s the time to escalate to their supervisor.
Here’s the quick, dirty, and impulsive draft I would write:
Hello X,
Y hasn’t been responsive when reviewing the chapters, and it’s really difficult to get back to chapters after a whole week passes by. By then I don’t even have the context! I’ve raised this multiple times and to no avail. Can you please get Y to be more responsive or find another editor for me to work with? I haven’t been able to make meaningful progress in a month!
Pretty brusque, isn’t it? I don’t normally dissect every email like this, but sometimes it helps to take a closer look and formalize the decision making behind each sentence. Thankfully, much of this becomes habitual over time.
Goals
First things first, I want the editor to be more responsive. Why? To have a shorter feedback loop when it comes to making changes. Why? To make it easier to write - it’s difficult to come back to the chapter after a long amount of time passed. Why? This pushes back timelines for each chapter.
I don’t really care about how to achieve this goal: the same person can be more responsive, or maybe I get a new point of contact to work with. Maybe there are other options I haven’t considered.
To summarize in a single sentence, the goal is to “reduce the feedback loop”.
Audience
The audience is the editor’s supervisor, or maybe someone else from the editorial team who’ll have the incentive to escalate.
I know that the timelines are very important to this publisher, which is something I can use. I can frame the concerns around impacts of the timeline - even if it’s not something I necessarily care about myself.
Since there are multiple ways to achieve my goal and I don’t particularly care about how, I can make the call for action open ended. I’m doing this because I’m comfortable with either outcomes - like the editor not being to improve response times, but the publisher providing more leniency around the schedule - which, while isn’t ideal, still helps.
Content
As multiple people can help me accomplish a goal, and I might not be aware of all of relevant parties - email format works best.
Narrative structure here is simple - I have a problem (the beginning), here’s why it’s bad (the middle), let’s fix it (the end).
This email is short enough not to require a TL;DR.
Impulse
As my concern is about a particular person, I have to talk about them. I don’t want to avoid candor, but I can approach the situation with empathy and assumption of best intentions something along the lines of: “I understand X has other commitments”. Focusing on facts and leading with empathy would help here.
Having an unresponsive editor is definitely frustrating, so it’s worth taking a step back, and maybe paying extra attention - there’s no use having frustration show through.
The result
After running through the checklist, we end up with (what I hope is) a better, more actionable, and less icky email:
Hello X,
When working with Y, it takes up to a week for me to receive feedback on the chapters I wrote. I understand Y is working with multiple engagements, but I’m concerned about the timelines for the book. If we continue as is, it’s likely we’ll have to push publishing date by X months.
Could you help me find a resolution here?
It’s short, omits unnecessary details, and leaves the reader with a clear (but open ended) call for action. Now, all that’s left is to schedule send that email in a morning, and wait for a response!
- Goals
-
Adjusting to working from home
Like many, I moved to working from home during the COVID-19 pandemic. Parts of California enacted shelter-in-place order back in March, and it’s been over a month and a half since then. I briefly worked from home back in 2013 as a freelancer - and I really got the whole work/life balance thing wrong. So this time around I’ve decided to approach remote work with a plan.
My day begins around 7 or 8 am, without too much deviation from schedule. I used to bike to work before the pandemic, and I try to head out for a 30 minute ride in a morning a few days a week. There aren’t a lot of people out early, and I love starting my day with some light cardio.
I share breakfast and coffee with my partner, often while catching up on our favorite morning TV show. At the moment I’m being educated on Avatar: The Last Airbender. Ugh, Azula!
Breakfast is followed by a calendar sync. We check if either of us have overlapping or sensitive meetings. That way we know which calls either of us needs to take in another room - and which are okay to have in our workspace. Both of our desks are in the living room, and we use noise cancelling headphones throughout the day to help with focus. During the day we convert our bedroom to an ad hoc conference room.

By 9 am, I have my desk set up: I replace my personal laptop with its corporate-issued counterpart. An external webcam helps with the image quality, and a dedicated display, keyboard (Vortex Pok3r with Matt3o Nerd DSA key cap set), and a mouse (Glorious Model O-) alleviate the cramped feeling I get when using a laptop.
Most importantly, I’m showered, groomed, and dressed by this time. While working in whatever I slept in has worked well for occasional remote Fridays, it proved to be unsustainable for prolonged remote work. Whenever I wasn’t dressed for work, I found myself slowly drifting towards the couch, and trading a laptop for my phone. In fact, some days I dress up even more than I used to when going to the office!
This is where the clear separation between home and work is established. I’m fully dressed and have my workstation set up: it’s work time!
I spend the next few hours busy with heads down work, usually working on a design, writing some code, or doing anything which requires concentration. Playing something like a Rainy Cafe in the background helps me stay in the zone.
Back in the office, 11 am used to be my workout time: a gym buddy of mine would consistency exercise at 11 am, and I adopted the habit of joining him over the past few years. I decided not to move the time slot: at 11 am I change into my workout clothes and exercise: 30 to 45 minutes of bodyweight exercises or online classes use up the remainder of my morning willpower. I’m so glad there are thousands of YouTube videos to keep me company!
My partner and I alternate cooking, and the next hour or so is reserved for cooking, lunch together, and cleanup. Remember the noise cancelling headphones? We haven’t heard (and often seen) each other since morning! Getting to share lunch daily has definitely been the highlight of staying at home for me.
After that - back to work: design reviews, meetings, busywork.
I wrap up around 5 pm, and make a point not to work past that. I swap out my work laptop for my own (even if I’m not planning to use it), and stow it away for the night. Disassembling my setup paired with showering and changing into house clothes creates a solid dividing line between work and home.
Cooking dinner together and evening activities follow, but that’s a story for another time. Stay healthy and productive!
-
Google Drive on Linux with rclone
Recently Dropbox hit me with the following announcement:
Basic users have a three device limit as of March 2019.
Being the “basic” user, and relying on Dropbox across multiple machines, I got unreasonably upset (“How dare you deny me free access to your service?!”) and started looking for a replacement.
I already store quite a lot of things in Google Drive, so it seemed like a no brainer: I migrated all my machines to Google Drive overnight. There was but only one problem: Google Drive has official clients for Windows and Mac, but there’s nothing when it comes to Linux.
I found the Internets to be surprisingly sparse on the subject, and I had to try multiple solutions and spent more time than I’d like researching options.
The best solution for me turned out to be
rclone, which mounts Google Drive as a directory. It requiresrcloneservice to be constantly running in order to access the data, which is a plus for me - I’ve accidentally killed Dropbox daemon in the past and had to deal with conflicts in my files.Install
rclone(instructions):curl https://rclone.org/install.sh | sudo bashFrom then on, rclone website some documentation when it comes to the setup. I found it somewhat difficult to parse, so here it is paraphrased:
Launch
rclone configand follow the prompts:n) New remotename> remote- Type of storage to configure:
Google Drive - Leave
client_id>andclient_secret>blank - Scope:
1 \ Full access to all files - Leave
root_folder_id>andservice_account_file>blank - Use auto config?
y - Configure this as a team drive?
n - Is this OK?
y
From here on, you can interact with your Google Drive by running
rclonecommands (e.g.rclone ls remote:to list top level files). But I am more interested in a continuous running service andmountis what I need:rclone mount remote: $HOME/DriveNow my Google Drive is accessible at
~/Drive. All that’s left is to make sure the directory is mounted on startup.For Ubuntu/Debian, I added the following line to
/etc/rc.local(beforeexit 0, and you needsudoaccess to edit the file):rclone mount remote: $HOME/DriveFor my i3 setup, all I needed was to add the following to
~/.config/i3/config:exec rclone mount remote: $HOME/DriveIt’s been working without an issue for a couple of weeks now - and my migration from Dropbox turned out to be somewhat painless and quick.
-
Desktop notifications from Chrome Secure Shell
For the past year or two I’ve been working in the cloud. I use Chrome Secure Shell to connect to my machines, and it works rather well. In fact, I moved away from my work Linux/Mac laptops towards an HP Chromebook, which fullfilled both requirements I had: a browser and a terminal. One thing I missed about a Linux machine though is lack of
notify-send-like functionality, especially when working with long-running builds.Yesterday I pinged hterm team for assistance with this matter, and turns out recent release of Secure Shell supports Chrome desktop notifications! Furthermore, two amazing engineers (thanks Andrew and Mike!) crafted an hterm-notify script, which propagates notifications to Chrome, and by extent to desktop!
I made a few tiny changes, mainly since I don’t use
screen, and tmux sets my$TERMtoscreen-256colorfor some reason:#!/bin/sh # Copyright 2017 The Chromium OS Authors. All rights reserved. # Use of this source code is governed by a BSD-style license that can be # found in the LICENSE file. # Write an error message and exit. # Usage: <message> die() { echo "ERROR: $*" exit 1 } # Send a notification. # Usage: [title] [body] notify() { local title="${1-}" body="${2-}" case ${TERM-} in screen*) # This one's really tmux printf '\ePtmux;\e\e]777;notify;%s;%s\a\e\\' "${title}" "${body}" ;; *) # This one's plain hterm printf '\e]777;notify;%s;%s\a' "${title}" "${body}" ;; esac } # Write tool usage and exit. # Usage: [error message] usage() { if [ $# -gt 0 ]; then exec 1>&2 fi cat <<EOF Usage: hterm-notify [options] <title> [body] Send a notification to hterm. Notes: - The title should not have a semi-colon in it. - Neither field should have escape sequences in them. Best to stick to plain text. EOF if [ $# -gt 0 ]; then echo die "$@" else exit 0 fi } main() { set -e while [ $# -gt 0 ]; do case $1 in -h|--help) usage ;; -*) usage "Unknown option: $1" ;; *) break ;; esac done if [ $# -eq 0 ]; then die "Missing message to send" fi if [ $# -gt 2 ]; then usage "Too many arguments" fi notify "$@" } main "$@"Throwing this in as
~/bin/notify(not forgetting tochmod +xand having~/binin the$PATH) I can get a notification when a particular long running command is complete:sleep 30 && notify Hooray "The sleep's done!" -
Profiling slow bashrc
I’ve recently noticed that it takes a long time for my bash to load. I’ve found following StackOverflow answer to be useful, and I based my solution to find a startup time hog in my
~/.bashrcupon it.First off, add following few lines to your
/etc/bash.bashrc,~/.bash_profile, or wherever you’d like to begin tracing the script:PS4='+ $(date "+%s.%N")\011 ' exec 3>&2 2>/tmp/bashstart.$$.log set -xAnd add following few lines where you want to stop the trace:
set +x
exec 2>&3 3>&-
Now start your bash session (you can simply open a new terminal Window for that). The above will create
/tmp/bashstart.<PID>.log. To analyze it, I wrote a little Python script:import argparse import heapq parser = argparse.ArgumentParser(description='Analyze bashstart log for speed.') parser.add_argument('filename', help='often /tmp/bashstart.<PID>.log') parser.add_argument('-n', default=20, help='number of results to show') args = parser.parse_args() filename, n = args.filename, int(args.n) with open(filename, 'r') as f: q = [] prev_time = None for line in f.readlines(): line = line.split() if '+' not in line[0] or len(line) < 3: continue text = ' '.join(line[2:]) seconds, nanoseconds = line[1].split('.') time = int(nanoseconds) diff = time - prev_time if prev_time is not None else 0 prev_time = time heapq.heappush(q, (diff, text)) for diff, text in heapq.nlargest(n, q): print float(diff) / 1000000000, 's:', textSave it as
bashprofile.py, and run it as follows (replace file name with an appropriate):python bashprofile.py /tmp/bashstart.2831.log -n 20 0.050056909 s: _powerline_init_tmux_support 0.045323022 s: _powerline_setup_prompt 0.044722024 s: _powerline_setup_prompt 0.044423727 s: '[' -f /usr/local/google/home/ruslano/.local/lib/python2.7/site-packages/powerline/bindings/bash/powerline.sh ']' 0.044364097 s: '[' -f /usr/local/google/home/ruslano/.local/lib/python2.7/site-packages/powerline/bindings/bash/powerline.sh ']' 0.044137159 s: _powerline_init_tmux_support 0.015839574 s: __shell_name=bash 0.010850276 s: command which which 0.010105462 s: PS2='\[\] \[\] \[\]' 0.010000598 s: PS3=' Select variant ' 0.009837956 s: complete -F _svn -o default -X '@(*/.svn|*/.svn/|.svn|.svn/)' svn 0.009767517 s: PS2='\[\] \[\] \[\]' 0.0095753 s: PS3=' Select variant ' 0.007915565 s: other_utils=(ant automake autoreconf libtoolize make mount patch readlink) 0.00771205 s: for script in version functions/selector cd functions/cli cli override_gem 0.007008299 s: for gnu_util in '"${gnu_utils[@]}"' 0.00693653 s: complete -F _crow crow 0.006803049 s: complete -F _svn -o default -X '@(*/.svn|*/.svn/|.svn|.svn/)' svn 0.006672906 s: for script in version functions/selector cd functions/cli cli override_gem 0.005912399 s: for entry in '${scripts[@]}'In my example, Powerline turned out to be a massive hog. Looks like I’ll have to troubleshoot the speed or plain disable it.
Don’t forget to remove the lines you added to your bash configuration files after you’re done profiling.
-
Managing cd bookmarks with apparix
A couple of months ago I discovered apparix: a set of commands which augment
cdwith bookmarks. It really is an amazing feeling when you zap between multiple directories far away just with a couple of keystrokes! Apparix provides three commands I use daily:to,bm, andapparix(program suggests aliasing last one toals). Here’s how I use it:$ pwd /Users/ruslan $ apparix --- portals --- expansions --- bookmarks j dotfiles /Users/ruslan/.dotfiles j blog /Users/ruslan/Projects/ruslanosipov.github.io $ to blog $ pwd /Users/ruslan/Projects/ruslanosipov.github.io $ cd source/_posts $ bm posts added: posts -> /Users/ruslan/Projects/ruslanosipov.github.io/source/_posts $ to dotfiles $ pwd /Users/ruslan/.dotfiles $ to posts $ pwd /Users/ruslan/Projects/ruslanosipov.github.io/source/_postsThe example above is self explanatory: you can see how over the span of a year apparix saves hours of navigating directories you frequent.
Installation
If you don’t like reading manuals, installation might be a confusing. But in reality it’s straightforward, you just need to add some functions or aliases to your shell’s configuration file.
Install
apparixusing your favorite package manager, and then pipe examples apparix offers into your shell’srcfile.apparix --shell-examples >> ~/.bashrcOpen your
.bashrc(or another corresponding configuration file), and pick the preferred way of using apparix: you’ll see functions for bash and aliases for csh given as examples. Pick whatever works for your shell, source yourrcfile, and you’re all set!Happy jumping!
-
Ranger - the CLI file manager
Ranger is a lightweight but powerful file manager with Vi-like key bindings. It shines at exploring file trees, looking for specific files, and performing bulk operations on folders and files. Three column layout will be very similar to Mac OS X users: center column shows contents of the current directory, left column lists contents of a parent directory, and the right column contains preview for the selected file or folder.

Ranger supports movement with familiar to Vi users
h,j,k, andlkeys, has internal command line which is invoked with:, as well as many other features and key bindings similar to Vi. Another great selling point - Ranger can be extended with custom commands and key bindings. Utility is written in Python, therefore all the commands are nothing more than Python scripts.
Installation
Ranger is easy to install and can be found in most public repositories, just install
rangerpackage using your favorite package manager. While you’re at it, you may want to install some external utilities to help Ranger properly display file previews (list is taken from ArchWiki page on Ranger):atoolfor archives.highlightfor syntax highlighting. ![for image previews]]CII.(libcaca)())lynx,w3morelinksfor HTML.mediainfoorperl-image-exiftoolfor media file information.poppler(pdftotext) for PDF.transmission-clifor BitTorrent information.w3mfor image previews.
After all the dependencies are installed, quickly start up
ranger, exit it withq, and runranger --copy-config=allto generate configuration files in~/.config/ranger.Usage
Here are a few of the key bindings and commands I found useful:
- Use spacebar to select files one by one. By selecting multiple files, you can
perform bulk operations on them. Use
Vto perform visual selection. Lowercasevreverses current selection. For instance, you can run:deleteafter selecting multiple files and folders. - As mentioned above, execute
:deleteto remove currently selected file (or files). - To fullscreen a preview window, hit
i. Hitiagain to return the preview window to it’s normal size. - Vi’s
ggandGallow you to jump to the top and bottom of the file list respectively. - Hit
zhto toggle hidden files display. - As in Vim,
/searches for a file in a current buffer, whilenandNlet you navigate to the next and previous matches respectively. - Similarly,
:filterallows you to only limit your view to the files matching a pattern. It’s also interactive - changes are applied as you type.
If you’re an avid Vim user, you’ll find using Ranger surprisingly intuitive. Otherwise you might get confused and scared away, probably for a good reason. Ranger is designed to provide Vi-like feel for file browsing, and it does that job well.
-
Power of the command line
Disclaimer: I am not advocating any specific tools or methodologies, but sharing a workflow I find to be efficient and pleasant.
I am a huge fan of working with CLI applications. I use Vim for editing code, composing emails, and various kinds of writing. When I have to manipulate huge amounts of email, I use Mutt: it’s intuitive tagging and regular expression engine are extremely useful for the task. I employ
ack,awk,grep, andsed- Linux utilities which allow for precise and fast text manipulation.However, I would not use CLI browsers like
elinksorw3m, and the idea of reading every email in Mutt gives me the creeps. I love the visualization web browser offers, something text-based prompt is not able to provide. And it doesn’t have to.There are two components to most of the tasks performed on a computer: analyzing output and entering input. Certain tasks employ one component more than the other. In most modern applications it’s rare to have both solid control from the user perspective and a pleasant informative UI. With increased visual component, it’s more time consuming to make the application do what you need, especially if your needs are esoteric. With more editing power, visual display becomes less complex in order to make editing tasks easier.
Where visual tools fall short
What is the alternative? Using multiple programs with different levels of control to accomplish one task: to edit text. Each of the programs excels in it’s own field: word processing software allows for beautiful fonts and document presentation, IDE lets you access aggregated meta information about your application. But most of the IDEs and word processors lack the powerful tools needed to manipulate the foundation of what user is working with - plain text.
Ode to plain text
I spend a lot of time writing and editing plain text. Be it source code, emails, documentation, or even blog posts. These tasks take up significant amount of my day, and it is only logical to substitute some of the visual presentation capabilities for effectiveness.
It is hard to mentally process data which is not explicitly and unambiguously visible: different levels of headings, hidden meta information. Unlike more obscuring formats, plain text is all there is - it has nothing to hide. If you don’t see it - it’s not there. If you do see it - you know exactly what it is.
One of my favorite tips from “Pragmatic Programmer” goes:
Use a single editor well
So I learned one editor well, and now I use it for all my writing and editing needs. I don’t have to jump between IDE, browser, and office software. Most of the text I edit is manipulated with one editor. There is only one set of key bindings to know, one skill to master and hone. Fast, without any additional thought, using single text editor and all of it’s powerful features is imprinted in muscle memory. One less task to worry about.
I write my documents in Markdown format, and later convert them to the desired output using
pandoc: be it an HTML page, PDF, or a Microsoft Word document. I use Vim, so I can rearrange paragraphs or manipulate lines within a couple of keystrokes. Since I spend so much time editing text, I also touch type, which makes me even more effective at the given task.Harness the power of the command line
When it comes to bulk manipulating files or working with version control - there is no better candidate then command line applications. There’s no need to go through a number of obscure menus, ticking and unticking checkboxes, and hoping that your desired result can be achieved with a program’s GUI.
Let’s look at a few scenarios some users face in their daily workflow.
Creating a backup
With GUI, you’d have to take multiple steps:
- Right click
file. - Left click on “Copy”.
- Right click on some empty space.
- Left click on “Paste”.
- Right click on a newly created copy.
- Left click on “Rename”.
- Switch to a keyboard.
- Type
file.bak.
The above steps can be sped up using shortcuts like
C-corC-v, but not by much. Here’s an alternative in bash:cp file{,.bak}While first variant would do great for a novice or a casual user - the second method would be much more preferred by an experienced user whose concern is speed.
Recursively bulk replacing text in a directory
Let’s assume we want to do a bulk replace text in a directory and all it’s subdirectories. We have our trusted IDE, let’s assume this IDE is already configured to work with a desired directory.
- Open your IDE.
- Select “Edit” menu.
- Select “Find and Replace” submenu.
- Click on a “Find” input field.
- Switch to a keyboard.
- Type
function_to_replace. - Switch to a mouse.
- Click on “Replace” input field.
- Switch to a keyboard.
- Type
new_function_name. - Switch to a mouse.
- Enable “Search in subdirectories” checkbox.
- Click “OK”.
Again, this can be shortened a bit with some keyboard shortcuts, but not by much. You still have to switch between keyboard and a mouse a total of 4 times, and you still have to click through all the menus. This does get time consuming if you do this often. Now let’s try to perform the same task in command line:
find . -type f | xargs sed -i 's/function_to_replace/new_function_name/g'Much faster, if you’re able to memorize the structure. And remembering what the commands do is much easier than it looks. Especially with the help of
manor, even better,bro(see http://bropages.org for latter).The above example demonstrates one of the biggest advantages of command line interfaces: an ability to redirect an output of one program into another, chaining the tools together. In this example, we first get a list of all files use
findtool, and then runsedtool on each of those files in order to replace the text.An output from any CLI tool can be fed into any other CLI tool. This allows for countless possibilities and high adaptability to unscripted scenarios.
Is it worth learning CLI tools over their GUI counterparts?
This depends on what your intentions are. If you’re a power user who writes and edits a lot of text or manipulates bulk amounts of text on a daily basis - than it’s definitely worth it. Time spent learning these tools will pay off. But if you’re a casual user whose needs end with writing an occasional email or two - then you probably don’t need to worry about this.
Hell, if you’ve read this far - this means you’re the former case. I can practically guarantee that you will benefit from employing command line tools and modal editors over their GUI counterparts.
I’ve put together a table for comparison between two. Indeed, there are different times when either GUI or CLI tools excel:
Factor CLI GUI Ability to combine/chain tools Yes No Easy to learn No Yes Efficient for a novice user No Yes Efficient for an experienced user Yes No Good for occasional use No Yes Good for repetitive tasks Yes No Presents visual information well No Yes As you can see - both CLI and GUI programs have their pluses and minuses. CLI tools seem to appeal to experienced users, while GUI tools are great for novice users and do excel in representing visual information. No matter what kind of interface you prefer, it’s crucially important to use the right tool for the job.
- Right click
-
Beyond grep
I search for things a lot, especially in my code. Or even worse - someone else’s code. For years
grepserved as an amazing tool for this: fast, simple, and yet powerful. That was until I discoveredackfor myself. An incredibly easy to usegrepimplementation built to work with large (or not really) code trees.A lot can be said to enforce superiority of
ackovergrepwhen it comes to working with code, and it’s all said here: ack’s features.Amazing thing is -
ackdoesn’t even need a tutorial. Learning progression is natural and “just happens” by researching necessary use cases as the need arises (ackhas a great manual entry).Here’s a typical use example for
ack:ack --shell 'gr[ae]y'Searches all shell script files in the current code tree for any occurrences of “gray” or “grey”. It will search
.sh,.zsh, and just about dot-anything;ackwill even check shebang lines for you.Ease of use, the fact that it’s ready to use out of the box, extensive file types, native support for Perl’s regular expressions:
ackdoes really good job at searching through code.Download it from Beyond grep.
-
Effective search with Mutt
I generally don’t use Mutt for everyday emails - I find smooth non-monospace fonts to be more pleasant to the eye, and the visualization my browser offers is hard to beat. The main use-case for me is composing long emails: Mutt lets me use my favorite text editor, which speeds up the editing of long and carefully composed responses.
Recently I added a new use-case to my work flow: searching through emails. Mutt has a powerful built-in regular-expressions engine, which is something the web Gmail client is missing.
Mutt has two ways of finding things: search and limit. “Search” just jumps from one matching letter to another, something along the lines what
/command does inless,more, orvim. “Limit” is something I am more used to with the web client, and it’s what I use the most.Using limits
Limit works the way regular search works in Gmail: it limits the view to conversations matching the query. Hit
l, and enter a search query.By default, Mutt will only search through the subject lines, but this behaviour can be changed by prefixing the command with a special identifier. For instance, searching for
~b orangeswill limit the view to all the messages which mention “oranges” in the message body. Here are a couple I use the most:~b– Search in the message body.~B– Search in the whole message.~f– Message originated from the user.~Q– Messages which have been replied to.
You can find full list in the Mutt Advanced Usage Manual.
Patterns can be chained to produce narrower results:
~f joe ~B apples. This will search for a message mentioning “apples” coming from an author whose name contains “joe”.Caching mail for faster search
You may find that searching whole messages is slow, especially if you have more than a couple hundred messages to search through. That’s because by default Mutt does not store messages for local use. This can be changed by specifying
header_cacheandmessage_cachedirvariables in your.muttrcfile:set header_cache = "$HOME/Mail" set message_cachedir = "$HOME/Mail"Now, after you perform your first search, it will cache every message you open, making all the consecutive searches lightning fast.
Oh, and keep in mind, Mutt stores messages and headers in plain text, so make sure the cache directory is not shared with anyone but yourself.
-
Three favorite bash tricks
I spend most of my development time in the shell - be it editing text with Vim or executing various console commands. I have quite a number of tricks in my daily repertoire, and I would like to share three tips today.
Edit current command with a text editor
I often end up having to change a long command I just typed, and using arrow keys to get to the correct spot is not favorable. Bash has the feature which lets you edit current command in a text editor of your choice. Hit
Ctrl + x,Ctrl + e(orCtrl + x + e), and you will be dropped into your text editor. Now you are able to edit the command, and it will be executed as soon as your write the file and exit the editor.You can use an editor of your choice by adding following line to your
.bashrcfile:export EDITOR=vimReplace
vimwith the name of your favorite editor.Update: It looks like for some machines setting
EDITORvariable is not enough. In this case, you also need to setVISUALenvironment variable.Edit recent command
You can edit your recent commands in a text editor of your choice by executing
fc beginning_of_the_command. For instance, if you runfc l, you will open most recent command starting with the letter “l”.You can execute
fcwithout any arguments to edit last executed command.Bash history autocomplete
Another great feature - “reverse intelligent search”. If you hit
Ctrl + rin your shell, you’ll be greeted by the following prompt:(reverse-i-search)`':Start typing a part of the command from your history, and you’ll see suggestions popping up. Hit
Enterto pick the command (you’ll be able to edit it before executing), or pushCtrl + gto return back.Like any of these tips? Have some of your own? Don’t hesitate to share those in the comments section down below.
-
Zero mail inbox
I use email a lot. Maybe not as much as some, but I receive and send a fair share of mail each day. You might find it odd, but I love using email. It’s a pleasant and calm experience, and sorting through a pile of messages every morning rewards me with a sense of achievement. There are, however, few tricks I have up my sleeve, and I would like to share them today. These tips will not necessarily make you more productive, but they will provide you a with a more pleasant and peaceful experience of managing your inbox.
But first, I would like to set the scene…
The wonderful Mailbox app
I started using iOS email client called Mailbox a little over a year ago, shortly after a release. Back then, before it was acquired by Dropbox, you had to wait in order for the company to grow their servers. I patiently waited “in line” for almost a month and I finally was able to transfer all my accounts to this wonderful mail client.
It was worth waiting for. Right after starting, Mailbox archived all the conversations in my inbox, and presented me with a list of unread emails which looked an awful lot like a To-Do list. You can read and reply, archive the important letters, delete junk, or resend a conversation to yourself after a certain time span as a reminder. This is an extremely simple idea, but it is essentially what anyone’s inbox is: a list of things which need to be done. Some emails have to be replied to, some have to be acted upon in some other way. The ones that don’t get archived are deleted right away.
Mailbox turned my trash-filled inbox into a clean list of items I need to do. Since then, there never was an email I forgot to reply to, nor an important thing I forgot to do. Inbox can be referred to as “To Do”, and an archive as “Done”. This scheme makes it nearly impossible to miss anything of importance.
Unfortunately, Mailbox is an iOS-only application, and I started noticing the shortcomings of the desktop experience. And I do use desktop mail far more often than mobile. I decided to have a set of rules for managing my inbox; and this is the workflow I have been successfully using for over a year.
Workflow outside of the Mailbox app

I only use Gmail, and there probably are ways to have the same experience on other platforms. However, the Mailbox app works only with Gmail.
The first thing which needs to be done in order to start using the zero mail inbox workflow - is to empty it from all the read mail. Thankfully, the Mailbox app archives all your previous conversations the moment you install it.
Next, there has to be a way to implement a “snooze” button. There are always times when you can’t reply to an email, but don’t exactly want to keep it in your inbox (what an eyesore). Gmail does not provide a native way to resend your emails at later times, but I found a Chrome extension called “Snooze Your Email for Gmail”, which adds a simple “Snooze” button to the Gmail UI.
Now that these two things are taken care of, there is a simple set of rules to be used when a new email comes in:
- Delete. Is it a notification? Does it require saving for future reference? A lot of things should be deleted. Bills, notifications, messages from robots: these don’t have to be saved. Items in Gmail trash live for 30 days, which is enough time to find something in case of an emergency. In addition, most of this information is available from some another source anyway.
- Snooze. Do you have time right now to read/reply/act upon this email? Remind yourself about it in a few hours or days instead.
- Archive. Conversation with a real person you might want to reference to later? I save all the email chains from humans, just in case I have to search through them at a later date.
- Reply and archive. Self-explanatory. Act upon and save for future reference.
- Let it be. This is an eyesore version of using the “Snooze” button. You usually want to do this only if there are more important emails to read and act upon before getting to this one.
Ideally, when you keep items in your inbox - this means they have to be acted upon in some way. There is no reason not to archive or delete conversations which don’t require actions.
Bonus point: labels
This is a recent addition to my repertoire. I found myself often searching through certain sets of email, and hence Gmail does not support regular expressions it’s quite a big pain in the neck for me when I can’t remember certain details. I created a set of thematic labels, which group emails by projects, products, and teams. And I started religiously assigning them to all the emails I archive. First it takes a bit of work, but after a while it becomes easy to identify a pattern and create filters to assist yourself with categorization.
As a result, I can narrow down a search to a thematic subset of emails, saving myself a lot of time and frustration.
-
Why I threw away my "To Do" list
I enjoy organizing things. I am accustomed to keeping neat “To Do” lists, written notes, and just about anything that will let me arrange my tasks instead of actually accomplishing them. I recently stopped writing things down, and the results were pleasantly surprising…
I was keeping a list of things I would need to complete. I organized it by priorities, and at some point I even used Gina’s fancy “Todo.txt” wrapper for managing it.
What I realized after using such a scheme, is that my list was growing longer and longer with every week. After a while, the number of tasks became hard to manage, and the number of tasks became permanent residents on my task list. Why did this happen? Well for one, I turned my list into a “check box machine”. Complete a task, check off a check box. There was no mindfulness about it: I was just completing task after task. “All right, this one is done, let’s move to a next one.” - this is what was constantly running through my head. Secondly, by writing down a task on my list in the first place, my brain would register it as being completed, and then I’d go on with my day. Needless to say, certain tasks would sit on my list for an indefinite amount of time.
After a while, I deleted my “To Do” list. Instead, every day I ask myself a simple question: “What should I do today to succeed at what I am trying to accomplish?”. This way, work becomes achievement driven. I started choosing tasks which provide the biggest impact, dedicating some days just to minor “clean up” tasks which I didn’t deem important enough for productive days.
I threw away my “To Do” list, and I am glad I did it. I love being mindful about my day, I know exactly what I need to accomplish in order to succeed. It’s easy to get caught up in a daily route, and forget that your life isn’t just a list of things to do, but a number of goals you want to reach. By not relying on a written manifesto cluttered with tasks, I am forced to concentrate on the bigger picture, where what I set out to accomplish has the highest possible impact on my life and career.
-
Why should you learn to touch type?
I have a confession to make. Up until recently I did not know how to touch type. I would do what most people around me did: push the keys however which way I felt; make a typo; look down at the keyboard to find the letter I mistyped; repeat the whole process. I would put out up to 50 words per minute with this method, with an embarrassing error rate (which usually went up if I was showing something to someone). I am now terrified to think about those times.
It wasn’t until I stumbled upon Steve Yegge’s article “Programming’s Dirtiest Little Secret”, that I fully understood the implications of not developing proper typing technique.
Picture the following: programmer Clara is working in a small software company. Clara doesn’t use any fancy IDEs nor extendible editors like emacs or vim. Clara uses Windows’ default “Notepad” program to write and edit her source code. She is defending herself by saying that she doesn’t need any advanced features, and that she knows every keyword she needs to use by heart. She spends hours tediously searching for the files on her computer, opening them in Notepad, holding down arrow keys to get to whichever chunk of code she needs to edit (or even worse - lifts her hands off a keyboard and uses a mouse to navigate the file). Her editor only goes back one step with the “undo” operation… But Clara has good memory and she can re-type the code she erased.
What do you think of Clara? You might say that she is wasting her time and she should learn herself a robust editor. And of course, you will be right.
One day, Clara’s company hired a new tech lead - Jane. Jane noticed that Clara is very slow at accomplishing tasks assigned to her. So Jane showed Clara how to save a lot of time by using an advanced editor she uses. Suddenly Clara discovered a whole new world in front of her: it became much easier to read the code with parts of it highlighted, and the new text editor showed her when she would make a typo or a big error - even before Clara compiled the code. And Clara didn’t even have to re-invent the code she deleted, she could just travel down the undo tree back to the time when she erased the code: all of a sudden it felt like she had access to a time machine! Jane even told her that there are plugins which can write some code for Clara! How amazing is that? It took a while for Clara to learn how to use the new editor, but after a few months, Clara became almost as fast at doing her job as Jane. Maybe Clara even received a promotion from doing so many things in a short period of time.
If you don’t know how to touch type - you are Clara. You are wasting your time. You look ridiculous to your colleagues when you stare down at your keyboard while typing. Interviewers secretly laugh at you when you make five errors in a four-letter word. You are frustrated by even the remote possibility of having to write more than you absolutely have to.
Writing is a big part of the job as a software engineer. You write code, documentation, ask questions. Most importantly, you have to communicate with your colleagues and users. Most of this interaction is written: it’s a great form of communication for the job - written notes can be saved and searched through later. As a software engineer, you bring value to your company and its users. And due to the arcane nature of the craft, communication becomes crucial. You can be the smartest programmer in the world and you can write the best piece of software out there, but no one will know about it unless you communicate why is it so great, what it does, and how to use it.
By learning how to type properly, you turn a keyboard into an extension of your hand. All you have to do in order to type - is just think of words and sentences. Your muscle memory does the rest.
I now type somewhere between 60 and 80 words per minute with what I find to be a low error rate - and I have been touch typing now for little over a month. If you care for your craft, you have no excuse for not mastering a proper typing technique.
-
Elegant Mutt setup for use with Gmail
I have been using Mutt for a while now. Wouldn’t say that it saves my time, but nor does it extend the amount of time I spend reading email. For me, the best part about Mutt is that it lets me use text editor of my choice - Vim. Everything else - keyboard shortcuts, minimalist design, and simplicity - already exists in Gmail.
I found configuration below to work really well for my needs: all of the important for me Gmail features are translated. Here’s my
.muttrcfile:bind editor <space> noop set alias_file = '~/.mutt/aliases.txt' set copy = no set display_filter = '$HOME/.mutt/aliases.sh' set edit_headers set editor = "vim +/^$ ++1" set folder = "imaps://imap.gmail.com/" set hostname = "gmail.com" set imap_check_subscribed set imap_pass = "$PASSWORD" set imap_user = "$USERNAME" set mail_check = 5 set move = no set postponed = "+[Gmail]/Drafts" set spoolfile = "+INBOX" set text_flowed = yes unset imap_passive unset record # Gmail-style keyboard shortcuts macro index ga "<change-folder>=[Gmail]/All Mail<enter>" "Go to all mail" macro index gd "<change-folder>=[Gmail]/Drafts<enter>" "Go to drafts" macro index gi "<change-folder>=INBOX<enter>" "Go to inbox" macro index gs "<change-folder>=[Gmail]/Starred<enter>" "Go to starred messages" macro index gt "<change-folder>=[Gmail]/Trash<enter>" "Go to trash" macro index,pager d "<save-message>=[Gmail]/Trash<enter><enter>" "Trash" macro index,pager y "<save-message>=[Gmail]/All Mail<enter><enter>" "Archive" source $alias_fileIt is quite self-explanatory, and includes such nice features as:
- Automatically adding addresses from read emails to address book (see below).
- Using vim as a text editor, with an ability to edit message headers/recipients from within vim.
- Ability to access all the default Gmail folders: All mail, Drafts, Inbox, Starred, Trash.
- Key bindings to delete and archive messages bound to
dandyrespectfully (I am a huge fun of a zero-mail inbox).
You might also want to have your password encrypted by GPG as opposed to leaving it in plain text in your
.muttrcfile. You can read how to do this here: Using Mutt with GPG.As you may have noticed,
.muttrcabove setsdisplay_filterto$HOME/.mutt/aliases.sh. This script is being executed every time you read an email, and it collects email address to$HOME/.mutt/aliases.txt. Contents of thealiases.share below:#!/bin/sh MESSAGE=$(cat) NEWALIAS=$(echo "${MESSAGE}" | grep ^"From: " | sed s/[\,\"\']//g | awk '{$1=""; if (NF == 3) {print "alias" $0;} else if (NF == 2) {print "alias" $0 $0;} else if (NF > 3) {print "alias", tolower($(NF-1))"-"tolower($2) $0;}}') if grep -Fxq "$NEWALIAS" $HOME/.mutt/aliases.txt; then : else echo "$NEWALIAS" >> $HOME/.mutt/aliases.txt fi echo "${MESSAGE}"Source: W. Caleb McDaniel.
This script will create
aliases.txtfile containing email addresses for search and auto completion of email-addresses. -
Using Mutt with GPG
Mutt is a great command line email client, but it does not offer a built-in way to store passwords. But that’s where GPG comes in. A while back I wrote an article on how to use GPG to store your passwords: GPG Usage, this is a more practical note about using GPG to store your passwords for mutt. This note implies that you already have installed and configured GPG (which you can learn how to do in above linked article).
First you will have to record a password to a GPG file. Replace
$PASSWORDwith your password and$ACCOUNTwith a desired account alias. You probably want to prefix this command with a space, to avoid writing your password to a history file.echo '$PASSWORD' | gpg --use-agent -e > ~/.passwd/$ACCOUNT.gpgNext, open your
~/.muttrcfile and add following line:set imap_pass = "`gpg --use-agent --quiet --batch -d ~/.passwd/$ACCOUNT.gpg`"Again, replace
$ACCOUNTwith the same account alias you specified earlier. Now you don’t have to re-enter your password every time you start Mutt. -
Remap your Caps Lock
The following three paragraphs are an angry
Caps Lockrant. Feel free to skip past it or join me by commenting below.I’ve had it with
Caps Lock! How many times did I accidentally press it while hitting theAkey! How many times did I meanTaborShift! There is an obvious problem with theCaps Lockplacement, and there being only a millimeter of space to designate it from an adjacent key, it is quite difficult to notice when you accidentally press it.Pushing
Caps Lockis more tolerable when typing, but while using keyboard controlled software it’s a real pain;vimturns into a beeping ravaging nightmare,vimperatormesses up all your bookmarks… Same thing with websites supporting keyboard shortcuts.When was the last time I ever used
Caps Lock? Over ten years ago, when I was playing a video game that usedCaps Lockto switch between running and walking. Em… Seriously? Time to put an end this nonsense.Linux and Mac
Drop this into your
~/bin/capslockremap, and don’t forget tochmod +x ~/bin/capslockremap. Now run the script with root privileges (that’ll last you until the next restart).#!/bin/sh # This temporarily remaps the Caps Lock key to a Control key. # The keyboard will return to the previous settings after a # reboot. The Linux console and the X Window system each # handles keypresses separately, so each must be remapped # separately. First remap the X keyboard since this does not # require root access. # Remap the Caps Lock key to a Control key for # the X Window system. if type setxkbmap >/dev/null 2>&1; then fi # You have to be root to remap the console keyboard. if [ "$(id -u)" != "0" ]; then echo "This script is not running as root so" echo "the console Caps Lock cannot be remapped." echo "Perhaps you forgot to run this under sudo." echo "Note that this problem does not effect X." echo "This only effects the consoles running on" echo "Alt-f1 through Alt-f6." exit 2 fi # Remap the CapsLock key to a Control key for the console. (dumpkeys | grep keymaps; echo "keycode 58 = Control") | loadkeysWindows
Download Sysinternals Ctrl2Cap v2.0, run it as Administrator with
installflag:ctrl2cap.exe /install.Source CapsLock Remap Howto - Noah.org.
-
Git pretty log output
This alias has been around the web for quite some time, but it does look fantastic indeed.

To add the alias
git pretty-log, execute the following command (join string prior to executing):git config alias.pretty-log 'log --graph --pretty=format:"%Cred%h%Creset -%C(yellow)%d%Creset %s %Cgreen(%cr) %C(bold blue)<%an>%Creset"' -
Download gists from prompt
I wrote a little script to download gists from the command prompt.
Generate your Github API Token under Settings -> Applications, change it within a script, and then:
chmod +x shgist.py
mv shgist.py ~/bin/shgist
Where ~/bin is a directory in your path. Now you can use it as shgist file to quickly download your gists (Gist on Github).
#!/usr/bin/env python # Ruslan Osipov # Usage: shgist keywords # Description: Gists downloader import urllib import urllib2 import sys import json token = 'Personal API Access Token' # Github Settings -> Applications class Gist: def __init__(self, token): """ token -- str, github token """ self.token = token self.url = 'https://api.github.com' def find_by_name(self, keywords): """ keywords -- list of strings """ gists, urls = self._get_gists() for i, gist in enumerate(gists): for keyword in keywords: if keyword not in gist: del gists[i] del urls[i] break if len(gists) == 0: print "Sorry, no gists matching your description" return if len(gists) == 1: self._download_gist(gists[0], urls[0]) return for i, gist in enumerate(gists): print i, gist while True: num = raw_input("Gist number, 'q' to quit: ") if num == 'q': print "Quiting..." return try: num = int(num) if 0 <= num < len(gists): break print "Number should be within specified range" except: print "Only integers or 'q' are allowed" self._download_gist(gists[num], urls[num]) def _download_gist(self, name, url): """ name -- str, filename url -- str, raw gist url """ print "Downloading %s..." % name gist = self._send_get_request(url) open(name, 'wb').write(gist) def _get_gists(self): """ Returns 2 lists which should be treated as ordered dict """ url = '/gists' response = self._send_get_request(self.url + url) response = json.loads(response) gists, urls = [], [] for gist in response: for name, meta in gist['files'].items(): gists.append(name) urls.append(meta['raw_url']) return gists, urls def _send_get_request(self, url): """ url -- str """ headers = { 'Authorization': 'token ' + self.token } request = urllib2.Request(url, headers=headers) response = urllib2.urlopen(request) return response.read() argv = sys.argv[1:] if not len(argv): print "Usage: shgist keywords" sys.exit(0) gist = Gist(token) gist.find_by_name(argv) -
Rename commit author in git
In some extremely rare cases you end up pushing data to the repo with the wrong credentials. If you are the only author and you’re as picky as I am, it can be corrected easily:
git filter-branch -f --env-filter
"GIT_AUTHOR_NAME='Stan Smith';
GIT_AUTHOR_EMAIL='stansmith@cia.gov';
GIT_COMMITTER_NAME='Stan Smith';
GIT_COMMITTER_EMAIL='stansmith@cia.gov';" HEAD
git push --force
In the case of there being multiple people working on a project, you may want to use the following gist posted by anonymous: https://gist.github.com/anonymous/2523336/ (again, followed by
git push
--force
). -
Mintty color scheme (Cygwin)

I find the default cygwin color palette to be a bit ugly, so here’s one that has softer colors. Add the following lines to your
.minttyrcand restart cygwin in order to apply changes.ForegroundColour = 131, 148, 150 BackgroundColour = 0, 0, 0 CursorColour = 220, 50, 47 Black = 7, 54, 66 BoldBlack = 0, 43, 54 Red = 220, 50, 47 BoldRed = 203, 75, 22 Green = 0, 200, 132 BoldGreen = 0, 200, 132 Yellow = 204, 204, 102 BoldYellow = 204, 204, 102 Blue = 102, 153, 204 BoldBlue = 102, 153, 204 Magenta = 211, 54, 130 BoldMagenta = 108, 113, 196 Cyan = 42, 161, 152 BoldCyan = 147, 161, 161 White = 238, 232, 213 BoldWhite = 253, 246, 227Update (December 2018): This theme is now packaged with the default Mintty distribution! Pull up Mintty/Cygwin and check for a theme called
rosipov(I didn’t pick the name). -
Use vim commands in a browser
I’ve been giving preference to a keyboard over mouse since I discovered vim for myself, as it’s a faster and more convenient way to go. I am a Chrome user and recently I found an amazing plugin: Vimium.
It does exactly what the name suggests, allowing you to use vim-like commands in your browser. You can freely move, switch between tabs, work with forms and click links using familiar vim key bindings.
A two minute long introductory video explains basic commands and you’re all set! I’ve been using Vimium for over a week now, an amusing experience which allows you to throw your mouse in a dark corner (well, not exactly: Vimium still has some issues with over-bloated ajax pages, not to mention Flash and other nasty stuff).
Check it out: http://vimium.github.com/.
-
Git: merge two repositories
Today I had to merge changes from one repository into another. Let’s assume you want to merge
betaintoalpha.Operations are performed in repo alpha:
git remote add beta_repo git@rosipov.com:beta.git
git fetch beta_repo
git merge beta_repo/master
In this case,
beta_repois the name you pick for remote.If you just need to cherry-pick a certain commit from
betayou can omit the last step and replace it with the cherry-pick.More on the topic of remotes: http://git-scm.com/book/ch2-5.html.
-
GPG Usage
To encrypt and decrypt files in Linux there is a utility called
gpg(Gnu Privacy Guard). This is a short GPG tutorial.Quick usage example
gpg -c foo.txtIt will prompt you for the passphrase and a confirmation. Now you will have the encrypted
foo.txt.gpgfile. To decrypt a file:gpg -d foo.txt.gpgThis will forward the output to the console. You can output it into a file:
gpg -d foo.txt.gpg > foo.txt
GPG keyring
This is all secure, but not quite enough if you are paranoid. Keys are what makes
gpggreat. Let’s generate a private key:gpg --gen-keyAnd create an ASCII version of a public key:
gpg --armor --export "John Doe" --output johndoe.txtPublic key
johndoe.txtcan be freely distributed. Now you can encrypt files for yourself only:gpg -e -r "John Doe" foo.txtNow if you decrypt a file it will require the passphrase you specified while generating a key. To encrypt a file for someone else you should have this person’s public key.
Let’s assume Stan Smith sent you a key,
stansmith.txt. You import it using:gpg --import stansmith.txtAnd encrypt the file:
gpg -e -r "Stan Smith" foo.txt -
GUI git difftool for Windows
A quick note on how to set up GUI difftool to use with git on Windows (Git Bash, Cygwin, etc…).
Download and install GUI diff tool of your choice, get the path to executable.
Create
difftool.shin directory included in your path (for exampleC:\Users\{username}\binin Git Bash). Let’s take SourceGear’s DiffMerge as an example.#!/bin/sh "C:/Program Files/SourceGear/Common/DiffMerge/sgdm.exe" "$1" "$2" | catAnd in your ~/.gitconfig:
[diff]
    tool = diffmerge
[difftool "diffmerge"]
    difftool.sh "$LOCAL" "$REMOTE"
And difftool is available via
git difftoolcommand now.