Category: Vim
-
Seven years of Mastering Vim
Oh, how the time flies. I published the first edition of Mastering Vim in 2018. Since then, it has been translated to Japanese and received its second edition.


In 2021, I wrote about how much money publishing Mastering Vim has earned, and I think now’s the perfect time to get an update.
Mastering Vim was never meant to become a bestseller, but it did fairly well given the fact that I haven’t done much promotional work and haven’t been particularly active in Vim space since then.
For the first edition of the book, I receive 16% royalties. For the second edition, I negotiated a step-up based on publisher’s net receipts (over the lifetime of the book): it starts as low as 16% and climbs as high as 25% once the publisher nets £40,000 from my book.
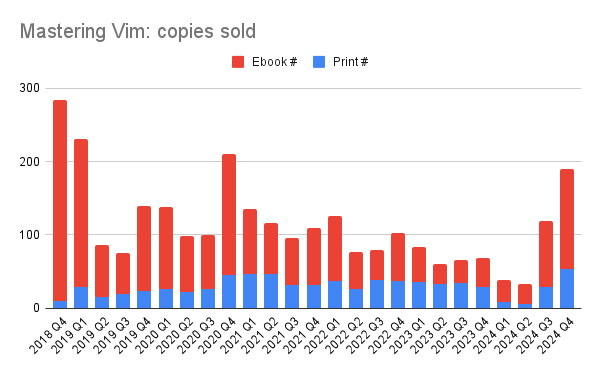
Here’s year over year sales and revenue data, you can see it to be predictable and steady:
Year Copies Revenue 2018 284* $363* 2019 533 $1,433 2020 548 $1,533 2021 458 $1,752 2022 386 $1,403 2023 279 $1,112 2024 381 $1,206 * Mastering Vim was published in Q4 2018.
On average, I earn about $5 for every print book sold, and a bit over $2 for every ebook sold.
In addition to book sales, I also receive a portion of translation fees (for the Japanese translation), as well as subscriptions to the publisher’s service (something I do not promote nor care about).
Book sales Translation fees Subscriptions $8,803 $1,669 $572 In the past seven years, Mastering Vim has sold close to 3,000 copies (not including the Japanese edition, which I have no visibility into). This has grossed slightly over $11,000 in total revenue. While this amount is definitely not enough to live off the royalty income, I have truly enjoyed learning more about the domain and becoming a subject matter expert throughout the writing process. Having a published book feels like a legacy artifact that I can be proud of. Of course, the quarterly royalty statements are a nice bonus as well.
If you’d like to see the book for yourself, Mastering Vim can be picked up on Amazon.
-
Second Edition of Mastering Vim
I haven’t posted on my blog in a while. Besides life getting in the way, most of the stack the site was built on has become obsolete and out of date. I couldn’t really do much without a major refresh, which I finally managed to complete a few days ago.
Now, for a belated announcement: I published the second edition of Mastering Vim (a little over 9 months ago)!
This edition features new (charming) illustrations, updated and improved code examples, and teaches you how to use Vim9script. I’ve also removed about 30 pages of unnecessary content from the first edition—I’m getting better at writing, after all! I believe the second edition of Mastering Vim is a fantastic introduction to Vim.
I’m also pleased to mention that this edition has been thoroughly edited by Christian Brabandt, a fitting successor as the lead of the Vim project after the passing of Bram Moolenaar, the original creator of Vim, in 2023.
If that sounds interesting, consider picking it up on Amazon (unfortunately your local bookstore is unlikely to stock one).
-
Vimwiki with Google Drive on ChromeOS
In the past few years my work heavily shifted towards being mostly done in a web browser. Much of what I use today is email and documents, and I’m able to SSH into a dedicated Linux machine for rare instances of coding or running some scripts. Because of that my primary machine these days is a trusty Chromebook - really just a web browser with an OS stapled on top of it.
I’ve used Vimwiki extensively for nearly 10 years now: it’s a fantastic way to organize my thoughts and everything I learn about the world, and it works with the tool I know and love - Vim. My Vimwiki followed me across machines, and I use Google Drive to keep it in sync regardless of the environment I use the Vimwiki in.
It took me way longer than I would like to admit to get Vimwiki working on my Chromebook: here lies the journey of getting the Vimwiki to work on a ChromeOS. There are three major hurdles I had to jump over:
- Getting Vim to run on ChromeOS.
- Getting Vimwiki, Google Drive, and ChromeOS to play together nicely.
- Getting the web view to work.
Good news is that ChromeOS allows you to run a Linux environment. Bad news, is that things can’t get a tiny bit finnicky.
First, set up Linux to run on ChromeOS via “Settings > Advanced > Developers > Linux Development Environment > Turn on”. After a few prompts and a freshly brewed cup of coffee, you’ll have a Debian Linux environment running on your Chromebook.
Newly installed Linux is accessible from the terminal:

Pop open the terminal and update Vim and get the latest version of Python:
sudo apt install python3 vimDownload and install Vimwiki however you’d like: there are extensive instructions on GitHub. If you’re anything like me, you might have a self-installing vim-plug, and all you need is just plop your existing .vimrc into your Chromebook Linux instance.
Now, for getting Google Drive, Vim, and ChromeOS to play together. ChromeOS and Linux are integrated well enough, and you can access your home directory through ChromeOS native file manager:

To share files in another direction, there’s a handy “Share with Linux” option for files:

This option shares files with Linux via
/mnt/chromeos. In Google Drive, I have avimwiki/folder which containswiki/andwiki_html/. I’m able to share that folder, and update Vimwiki configuration accordingly:let g:vimwiki_list = [{ \ 'path': '/mnt/chromeos/GoogleDrive/MyDrive/vimwiki/wiki/', \ 'template_path': '/mnt/chromeos/GoogleDrive/MyDrive/vimwiki/wiki/templates', \ 'template_default': 'default', \ 'template_ext': '.html'}]Now there’s a corner case I ran into when I had Vimwiki set up on a different account than the one I use to log into the Chromebook. Only the primary account’s Google Drive shows up in ChromeOS file manager. To work around that, I had to share my
vimwiki/folder with the primary account, and then share that with Linux. The resulting directory was available through a/mnt/chormeos/GoogleDrive/ShortcutsSharedWithMe/...:
At this point Vimwiki works just fine: working with the wiki and generating HTML is functional. All that’s left is getting the generated Vimwiki to show up in the web browser. Ever since Chrome disabled local file access, I (expectedly) haven’t been able to get
:Vimwiki2HTMLBrowseto function, since simplefile:///URLs aren’t accessible for security reasons.That’s where Python comes in, with it’s native web server module. I made a small alias in my
.bashrc:alias vimwiki="cd /mnt/chromeos/GoogleDrive/MyDrive/vimwiki/ && python3 -m http.server"Next thing you know, I’m finally able to access the generated web version of my Vimwiki via
localhost:8000/wiki_html:
-
How I use Vimwiki
I’ve been using Vimwiki for 5 years, on and off. There’s a multi year gap in between, some entries are back to back for months on end, while some notes are quarters apart.
Over those 5 years I’ve tried a few different lightweight personal wiki solutions, but kept coming back to Vimwiki due to my excessive familiarity with Vim and the simplicity of the underlying format (plain text FTW).
I used to store my Vimwiki in Dropbox, but after Dropbox imposed a three device free tier limit, I migrated to Google Drive for all my storage needs (and haven’t looked back!). I’m able to view my notes on any platform (including previewing the HTML pages on mobile).
I love seeing how other people organize their Wiki homepage, so it’s only fair to share mine:

I use Vimwiki as a combination of a knowledge repository and a daily project/work journal (
<Leader>wi). I love being able to interlink pages, and I find it extremely helpful to write entries journal-style, without having to think of a particular topic or a page to place my notes in.Whenever I have a specific topic in mind, I create a page for it, or contribute to an existing page. If I don’t - I create a diary entry (
<Leader>w<Leader>w), and move any developed topics into their own pages.I use folders (I keep wanting to call them namespaces) for disconnected topics which I don’t usually connect with the rest of the wiki: like video games, financial research, and so on. I’m not sure I’m getting enough value out of namespaces though, and I might revisit using those in the future: too many files in a single directory is not a problem since I don’t interract with the files directly.
Most importantly, every once in a while I go back and revisit the organizational structure of the wiki: move pages into folders where needed (
:VimwikiRenameLinkmakes this much less painful), add missing links for recently added but commonly mentioned topics (:VimwikiSearchhelps here), and generally tidy up.I use images liberally (
{{local:images/nyan.gif|Nyan.}}), and I occasionally access the HTML version of the wiki (generated by running:VimwikiAll2HTML).I’ve found useful to keep a running todo list with a set of things I need to accomplish for work or my projects, and I move those into corresponding diary pages once the tasks are ticked off.
At the end of each week I try to have a mini-retrospective to validate if my week was productive, and if there’s anything I can do to improve upon what I’m doing.
I also really like creating in-depth documentation on topics when researching something: the act of writing down and organizing information it helps me understand it better (that’s why, for instance, I have a beefy “financial/” folder, with a ton of research into somewhat dry, but important topics - portfolio rebalancing, health and auto insurance, home ownership, and so on).
Incoherent rambling aside, I’m hoping this post will spark some ideas about how to set up and use your own personal wiki.
-
Sane Vim defaults (from Neovim)
Vim comes with a set of often outdated and counter-intuitive defaults. Vim has been around for around 30 years, and it only makes sense that many defaults did not age well.
Neovim addresses this issue by being shipped with many default options tweaked for modern editing experience. If you can’t or don’t want to use Neovim - I highly recommend setting some these defaults in your
.vimrc:if !has('nvim') set nocompatible syntax on set autoindent set autoread set backspace=indent,eol,start set belloff=all set complete-=i set display=lastline set formatoptions=tcqj set history=10000 set incsearch set laststatus=2 set ruler set sessionoptions-=options set showcmd set sidescroll=1 set smarttab set ttimeoutlen=50 set ttyfast set viminfo+=! set wildmenu endifThe defaults above enable some of the nicer editor features, like
autoindent(respecting existing indentation),incsearch(search as you type), orwildmenu(enhanced command-line completion). The defaults also smooth out some historical artifacts, like unintuitive backspace behavior. Keep in mind, this breaks compatibility with some older Vim versions (but it’s unlikely to be a problem for most if not all users). -
Status bar color in Vim terminal mode
If you’re using a custom color scheme (why wouldn’t you?) in conjunction with a terminal mode in Vim (again, why wouldn’t you?), you may have noticed that the terminal status bar has no respect for your color scheme.
Run
:term, and you’ll be greeted to the default status bar:
Since terminal mode is still in beta in Vim 8.1, we have to manually set the highlighting groups. It’ll require a bit of digging.
Navigate to the directory containing your current color scheme. Depending on the plugin manager, the color schemes are located in different places. On Linux, default color schemes often live in
/usr/share/vim/vimcurrent/colors. In this example, I’m using PaperColor scheme, and I have it installed using vim-plug in~/.vim/plugged/papercolor-theme, andcolors/PaperColor.vimis the file we’re looking for.Search for
StatusLineandStatusLineNC(tip: you can do a whole word search in Vim by running/\<StatusLine\>), and note the values used (you might have to jump through a few variables if the color scheme author decided to be fancy). You’re interested inctermbg,ctermfg,guibg, andguifg.You might find something like this:
hi StatusLine ctermbg=24 ctermfg=254 guibg=#004f87 guifg=#e4e4e4
hi StatusLineNC ctermbg=252 ctermfg=238 guibg=#d0d0d0 guifg=#444444
Copy those lines to your
~/.vimrc. ChangeStatusLinetoStatusLineTerm, and changeStatusLineNCtoStatusLineTermNC:" Manually set the status line color. hi StatusLineTerm ctermbg=24 ctermfg=254 guibg=#004f87 guifg=#e4e4e4 hi StatusLineTermNC ctermbg=252 ctermfg=238 guibg=#d0d0d0 guifg=#444444Reload
~/.vimrc(:w | so %), and the terminal mode status line should have the same colors as your color scheme:
Above,
hiis a shorthand forhighlight, which is used to define highlight group colors.StatusLineTermandStatusLineTermNCdefine the highlight groups for terminal mode status line (in active and inactive windows respectively). Optionsctermbgandguibgdefine the background color, andctermfgandguifgare responsible for the foreground (text) color. -
My book has been published!
Over the past six to nine months I’ve been working on a book - Mastering Vim. Mastering Vim is a passion project which is meant to take the reader (you) from zero to a hero (future you): from knowing nothing about Vim, to becoming a power user. I cover many of Vim’s mysterious commands, philosophy behind the beloved editor, configuration tips, a plethora of community created plugins, as well as creating your own plugins.
Mastering Vim was written with support from Packt Publishing and was kindly reviewed by Bram Moolenaar (website) - the creator of Vim. Many people made this book possible, including VimConf Japan crew, who kindly hosted me earlier this year. Thank you to everyone for making Mastering Vim happen!
Give it a read and let me know what you think, Mastering Vim is available on Amazon!
P.S: This post, like many others, is written in Vim.
-
Cross-platform vim-plug setup
I’ve recently switch to vim-plug, a lightweight Vim plugin manager.
It comes with a little
.vimrcsnippet which downloads the plugin, but it only works for Unix. I use Vim across all three platforms regularly, so I updated the snippet:" Download and install vim-plug (cross platform). if empty(glob( \ '$HOME/' . (has('win32') ? 'vimfiles' : '.vim') . '/autoload/plug.vim')) execute '!curl -fLo ' . \ (has('win32') ? '\%USERPROFILE\%/vimfiles' : '$HOME/.vim') . \ '/autoload/plug.vim --create-dirs ' . \ 'https://raw.githubusercontent.com/junegunn/vim-plug/master/plug.vim' autocmd VimEnter * PlugInstall --sync | source $MYVIMRC endifThe above should work across all three major OSes, since Windows 10 recently received
curlsupport. -
My .vimrc, annotated
I’ve been using Vim for anywhere between 5 and 10 years, and my
.vimrcis all grown up. I use{{{1to annotate folds in my.vimrc, and usezMto close all folds andzRto open all folds (zc,zo, andzarespectively close, open, and toggle individual folds). The---lines are simply cosmetic." => Pre-load ------------------------------------------------------------- {{{1 set nocompatible " Required for many plugins, ensures it's not compatible with " Vi, which nobody uses at this point. filetype plugin indent on " Great answer: https://vi.stackexchange.com/a/10125Vundle is downright fantastic plugin manager. It allows one to install plugins with
:PluginInstalland upgrade plugins with:PluginUpdate. Simple, easy, reliable. Of course you’ll need to have Vundle installed, which I normally have as a git submodule." Required Vundle setup. set runtimepath+=~/.vim/bundle/vundle set runtimepath+=$GOROOT/misc/vim call vundle#rc() " => Vundle plugins ------------------------------------------------------- {{{1 Plugin 'gmarik/vundle' " The Vundle itself, to keep itself updated. " Colorschemes: Plugin 'NLKNguyen/papercolor-theme' Plugin 'ajh17/Spacegray.vim.git' Plugin 'altercation/vim-colors-solarized' Plugin 'squarefrog/tomorrow-night.vim' Plugin 'vim-scripts/ScrollColors' " Allows scrolling through colorschemes. " Language/tool integration and support: Plugin 'burnettk/vim-angular' Plugin 'fatih/vim-go' Plugin 'christoomey/vim-tmux-navigator' Plugin 'mileszs/ack.vim' Plugin 'motemen/git-vim' Plugin 'nvie/vim-flake8' Plugin 'pangloss/vim-javascript' Plugin 'scrooloose/syntastic.git' " Syntax checker. Plugin 'tpope/vim-fugitive.git' " Even better Git support. " Quality of life: Plugin 'EinfachToll/DidYouMean' " For typos during opening files. Plugin 'ciaranm/detectindent' " Automatically detect indent. Plugin 'ervandew/supertab' " Smarter autocompletion. Plugin 'junegunn/goyo.vim' " A plugin for writing prose. Plugin 'majutsushi/tagbar' " List tags in a sidebar. Plugin 'scrooloose/nerdtree' " A directory tree in a sidebar. Plugin 'tomtom/tcomment_vim' " Easy comment blocks with <Leader>cc. Plugin 'tpope/vim-abolish' " Extended abbreviation/substition. Plugin 'tpope/vim-repeat' " Intelligent repeat with '.' Plugin 'tpope/vim-surround' " Work with pairs of quotes/anything. Plugin 'tpope/vim-unimpaired.git' " Handy bracket mappings. Plugin 'tpope/vim-vinegar' " Enhanced directory browser. Plugin 'vim-scripts/DirDiff.vim' " Directory level diff. " New features: Plugin 'Lokaltog/vim-easymotion' " Easy navigation with <Leader><Leader>w. Plugin 'kien/ctrlp.vim' " Hit <C>p for a list of files/buffers. Plugin 'vim-scripts/Gundo.git' " Intelligent undo tree. Plugin 'vim-scripts/vimwiki' " A personal local Wiki. if v:version > 703 Plugin 'SirVer/ultisnips' " Intricate snippets. Plugin 'chrisbra/vim-diff-enhanced' endif " => Plugins configuration ------------------------------------------------ {{{1 " NERDTree: auto close if last window. function! s:CloseIfOnlyNerdTreeLeft() if exists("t:NERDTreeBufName") if bufwinnr(t:NERDTreeBufName) != -1 if winnr("$") == 1 q endif endif endif endfunction " Force Gundo preview to the bottom. let g:gundo_preview_bottom = 1 " Map Gundo. nnoremap <F5> :GundoToggle<cr> " DetectIndent: Enable and configure. augroup detectindent autocmd! autocmd BufReadPost * :DetectIndent augroup END let g:detectindent_preferred_expandtab = 1 let g:detectindent_preferred_indent = 2 " UltiSnips: Compatibility with YouCompleteMe via SuperTab. let g:ycm_key_list_select_completion = ['<C-n>', '<Down>'] let g:ycm_key_list_previous_completion = ['<C-p>', '<Up>'] let g:SuperTabDefaultCompletionType = '<C-n>' let g:UltiSnipsExpandTrigger = "<tab>" let g:UltiSnipsJumpForwardTrigger = "<tab>" let g:UltiSnipsJumpBackwardTrigger = "<s-tab>" " VimWiki: default location. let g:vimwiki_list = [{ \ 'path': '$HOME/Dropbox/wiki', \ 'template_path': '$HOME/Dropbox/wiki/templates', \ 'template_default': 'default', \ 'template_ext': '.html'}] " Map Tagbar. nnoremap <F8> :TagbarToggle<cr> " Synastic configuration. let g:syntastic_always_populate_loc_list = 1 " Make :lnext work. let g:syntastic_html_checkers = [''] let g:syntastic_javascript_checkers = ['gjslint', 'jshint'] let g:syntastic_javascript_gjslint_args = '--strict' let g:syntastic_python_checkers = ['gpylint']Most plugins above change slightly change daily Vim workflow: the way one navigates files, replaying actions, working with snippets, minor tweaks to editing - and I highly recommend at least skimming through README of plugins you’re interested in so you can incorporate the changes in your workflow.
I have a set of simple defaults I use everywhere, major changes being changing
:to;and moving my leader key to a spacebar. Everything else are tiny quality of life tweaks." => Editing -------------------------------------------------------------- {{{1 syntax on " Indentation settings. set autoindent set expandtab set shiftwidth=4 set softtabstop=4 set tabstop=4 " Disable backups and .swp files. set nobackup set noswapfile set nowritebackup " Semicolon is too long to type. nnoremap ; : vnoremap ; : " Map leader key. let mapleader = "\<Space>" " Use system clipboard. set clipboard=unnamedplus " Enable wild menu (tab command autocompletion). set wildmenu set wildmode=list:longest,full " Don't complain about unsaved files when switching buffers. set hidden " Make soft line breaks much better looking. if v:version > 703 set breakindent endif " Pretty soft break character. let &showbreak='↳ ' " => Looks ---------------------------------------------------------------- {{{1 set background=dark colorscheme spacegray " Set terminal window title and set it back on exit. set title let &titleold = getcwd() " Shorten press ENTER to continue messages. set shortmess=atI " Show last command. set showcmd " Highlight cursor line. set cursorline " Ruler (line, column and % at the right bottom). set ruler " Display line numbers if terminal is wide enough. if &co > 80 set number endif " Soft word wrap. set linebreak " Prettier display of long lines of text. set display+=lastline " Always show statusline. set laststatus=2 " => Movement and search -------------------------------------------------- {{{1 " Ignore case when searching. set ignorecase set smartcase " Fast split navigation. nnoremap <C-j> <C-W><C-J> nnoremap <C-k> <C-W><C-K> nnoremap <C-l> <C-W><C-L> nnoremap <C-h> <C-W><C-H> " Absolute movement for word-wrapped lines. nnoremap j gj nnoremap k gk " => Misc ----------------------------------------------------------------- {{{1 " Use Unix as the standart file type. set ffs=unix,dos,mac " Ignore compiled files. set wildignore=*.o,*~,*.pyc,*.pyo " Ignore virtualenv directory. set wildignore+=env " Fold using {{{n, where n is fold level set foldmethod=marker " => Fixes and hacks ------------------------------------------------------ {{{1 " Ignore mouse (in GVIM). set mouse=c " Fix backspace behavior in GVIM. set bs=2 " NERDTree arrows in Windows. if has("win32") || has("win64") || has("win32unix") let g:NERDTreeDirArrows = 0 endif " Increase lower status bar height in diff mode. if &diff set cmdheight=2 endif " Unfold all files by default. au BufRead * normal zRI have some custom commands and shortcuts I’m using, but not too many. I find that I mostly just forget to use shortcuts I make, and I end up deleting lines from this section regularly.
" => Custom commands ------------------------------------------------------ {{{1

" Trim trailing whitespace in the file.
command TrimWhitespace %s/\s\+$//e

" Command to close current buffer without closing the window.
command Bd :bp | :sp | :bn | :bd

" => Leader shortcuts ----------------------------------------------------- {{{1

nnoremap <Leader>] <C-]>          " Jump to ctags tag definition.
nnoremap <Leader>p :CtrlP<cr>     " Fuzzy complete for files.
nnoremap <Leader>t :CtrlPTag<cr>  " Fuzzy complete for tags.
nnoremap <Leader>r :redraw!<cr>   " Redraw the screen (for visual glitches).
nnoremap <Leader>w :w<cr>         " Write a file.
Hope you find this useful and take away a few bits and pieces for your own workflow.
-
DidYouMean plugin for Vim
DidYouMean Vim plugin is very simple: it asks you if the file you are trying to open is indeed the right file. How is this useful? Here’s how:

Say you have two files with a similarly starting names:
model.pyandmodel_test.py. You typevim mo, you hit tab to autocomplete the name, you hit enter. In vanilla Vim, you’d be opening a new file:model, since that’s where shell’s tab-completion stopped. DidYouMean detects such a nuance and asks you if you wanted to openmodel,model.py, ormodel_test.py.Simple idea, and instantly after trying this out, I would really expect this feature to be included in vanilla Vim.
-
Gundo tree for Vim
One of the obscure, but tremendously useful features of Vim is an undo tree. You would expect Vim to have a simple stack for undo and redo actions, but it’s much more complex than that: Vim keeps track of every change you made in the current session, making it possible to access change history beyond basic
uandC-rcommands.Default interface for accessing far out branches of the undo tree leaves to be desired, but that’s where Gundo comes in.

Gundo provides an easy to use interface for navigating history branches. In the screenshot above, I am previewing a diff in one of the undo tree branches inaccessible via
ucommand.As per author’s recommendation, I mapped the plugin to
F5, which seems quite convenient to me:nnoremap <F5> :GundoToggle<CR>Usage is quite easy.
F5opens or closes the undo tree,jandkare used to travel through changes. Enter key applies the changes. -
My experience switching to buffers
About a year ago I stumbled upon an article explaining the difference between Vim tabs and buffers. The author emphasized that tabs are merely window layouts, and therefore one-file-per-tab idea I was used to at the moment just wasn’t proper. Instead, author suggested the use of buffer commands to switch between multiple files. I decided to give it a shot, and here are some ideas I would like to share after switching to the use of buffers.
Buffers are open files (they also may not be associated with any files), but they’re not necessarily visible at any given moment. In Vim, windows are not linked to any particular buffer, so you can easily cycle through buffers from within any window.
First and foremost, you probably want to add
set hiddento your.vimrc. This option lets you switch between buffers without having to save files.At it’s basics, you only need few commands for operating buffers:
- Use
:lsto list all buffers for this session. - To move between next and previous buffers use
:bnand:bprespectively. - Use
:b partial_buffer_namefor navigating to the buffer of your choice. Buffer name auto-complete is supported. - You can also use
:bN, whereNis a buffer number to jump to a specific buffer. - Get in a habit of closing buffers you will not use with
:bd.

The hardest thing about stopping to use tabs and switching to buffers instead is not having the visual aid: I was used to having a list of files always available at a glance, at the top of my screen. To check what files I’m working on now - I have to hit four keys:
:ls(fourth being “Enter”).Not surprisingly, this taught me to be more mindful about my editing experience. I usually have a clear structure of the files I’m working on in my head. And if the list is getting to long to easily remember, then I’m probably doing something wrong: time to take a break and reset my Vim session.
The experience overall reminded me of my recent switch to blank keyboard key caps: with no inscriptions to aid you, I first felt a bit at loss, especially with they keys I couldn’t find without looking: like function keys or special symbols. But after some time with the blank key caps, I improved my typing skill, and know where even the most obscure characters hide. The switch helped me to improve my typing experience overall.
With Vim, it’s a similar story. After getting past the initial confusion, I achieved high level of awareness about my editing sessions. It didn’t make the editing process any faster, but instead much more satisfying.
But you already new that, since Vim isn’t really about speed.
UPDATE: Made a few corrections and added a
:b partial_buffer_namecommand thanks to /u/___violet___’s Reddit comment. - Use
-
Custom templates in vimwiki
I got myself into a habit of using vimwiki for the past year: it helps me to keep track of random bits of information, work and project notes, as well as daily goals and achievements. You can read more about vimwiki in an article I wrote a while back: “Personal wiki with vimwiki”.

One of vimwiki’s features I really like is an ability to convert whole wiki to HTML with a single command:
:VimwikiAll2HTML. There is one annoyance though: HTML vimwiki pages don’t have any navigation elements: the only way to navigate between pages is by clicking through links within a page or using browser’s “back” button.Luckily, vimwiki has a setting which allows using custom templates for generating HTML. Assuming your wiki is in
$HOME/Dropbox/wiki(can be anywhere else though), make following changes to your.vimrc:let g:vimwiki_list = [{ \ 'path': '$HOME/Dropbox/wiki', \ 'template_path': '$HOME/Dropbox/wiki/templates', \ 'template_default': 'default', \ 'template_ext': '.html'}]After that, create a
$HOME/Dropbox/wiki/templates/default.htmlusingvimwiki/autoload/vimwiki/default.tplas a base. I added simple navigation bar to my default template:<html> <head> <link rel="Stylesheet" type="text/css" href="%root_path%style.css" /> <title>%title%</title> <meta http-equiv="Content-Type" content="text/html; charset=utf-8" /> </head> <body> <a href="%root_path%index.html">Index</a> | <a href="%root_path%diary/diary.html">Diary</a> <hr> <div class="content"> %content% </div> </body> </html>Now it’s much easier to jump between wiki entries. Of course, customization doesn’t end there: you can change styles, add JavaScript and make your wiki all fancy and advanced.
If you’d like to get even better about using Vim, I wrote a book about it: Mastering Vim. I’m pretty proud of how it turned out, and I hope you like it too.
-
Distraction-free writing with VimRoom
Recently I’ve been writing much more than I used to: long emails, software documentation, personal Wiki, keeping work journal, blogging, writing challenges… Luckily enough, I do all of this writing in Vim. But sometimes writing prose in Vim might feel a bit unnatural, especially if you have a wide screen: text will be on the very left side of the screen, or (if
textwrapis not enabled) you’ll end up with lines hundreds of characters long. And overall, editing text in Vim sometimes might feel a bit clunky - with all the extra information and high-tech (or low-tech, depending on your perspective) look.I found a simple, yet sufficient solution for this issue: VimRoom. It’s a Vim plugin which enters distraction-free writing mode, by centering the 80-character block of text on your screen. It’s highly configurable, and I found it to look especially pleasing on vertical monitors (which I prefer to use for writing). It looks presentable even on smaller screens though, here’s a screenshot:

Install the plugin (use a package manager like Vundle or Pathogen to simplify the task) and add a following line to your
.vimrc:nnoremap <Leader>vr :VimroomToggle<CR>Now, hit
<Leader>vrto drop in/out of the VimRoom mode (<Leaderis a backslash\character by default).GitHub link: https://github.com/mikewest/vimroom.
-
Personal wiki with vimwiki
I recently found an interesting way to organize random bits of information: a personal Wiki. It’s a great idea to have data repository shared between your machines: important notes about people, conversations, events, tasks you’ve accomplished, thoughts, and a hundred of little pieces of knowledge which don’t belong anywhere else. There is plenty of software out there which lets you set up a personal Wiki, and some of it is very lightweight and well polished. However, I prefer to do most of my editing and writing in Vim. As tip #22 from “The Pragmatic Programmer” states:
Use a single editor well
We think it is better to know one editor very well, and use it for all editing tasks: code, documentation, memos, system administration, and so on. Without a single editor, you face a potential modern day Babel of confusion.
I fully agree with the above statement and I try to use one editor for the majority of tasks which require typing, without having to remember which editor contains certain features, and which doesn’t. That’s one of the main reasons I went with
vimwiki- a lightweight and clean personal Wiki with it’s own Wiki-style markdown. Oh,vimwikialso subscribes to another tip from “The Pragmatic Programmer”:Keep knowledge in plain text
The
vimwikiplugin has a number of interesting and useful features:- Memorable mappings for moving in and out of Wikis. Hit
<leader>wwand you are on the home page of your Wiki. The<leader>wtwill open the Wiki in a new tab: the rest of the mappings are as intuitive. - Multiple Wikis support: really handy if you have a number of separate projects for which you want to keep separate entries.
- Diary-like quick notes. You can create an instant page for today by hitting
<leader>w<leader>w. Combination<leader>wibrings you to a diary home page, and<leader>w<leader>ire-indexes the diary entries. - Easy link creation: hit enter on a word and it will turn into a link to
another page. Hitting enter on a link will transport you to the destination
page. Simply surrounding text with double square brackets (
[[]]) works as well. - Navigation: enter to follow a link, backspace to go back.
- You can convert all your records into html by executing
:VimwikiAll2HTML. - Extensive and well written help file. Just run
:help vimwikiand start reading.
The list can go on forever, but these are the features I found to be the most useful.
In order to enjoy synchronization between all my machines, I hosted my Wiki in a Dropbox folder -
vimwikilets you specify locations from each one of your Wikis.let g:vimwiki_list = [{'path': '$HOME/Dropbox/wiki'}]Download it from the GitHub: https://github.com/vimwiki/vimwiki.
- Memorable mappings for moving in and out of Wikis. Hit
-
Easy commenting with tcomment.vim
This plugin has been in my
.vimdirectory for a few years, and I sometimes forget that it’s not a built-in Vim feature.Link to a GitHub repository: https://github.com/tomtom/tcomment_vim.
-
Navigate files easily with ctrlp.vim
Few years ago I used a lightweight IDE called “Sublime Text 2”. And one of the most compelling features of it was an ability to switch between files by hitting
Ctrl+Pand typing in a part of the file name.This is exactly what
ctrlp.vimimplements in vim. Usage is extremely simple: install the plugin, hitCtrl+P, type a part of the file name, select a desired file and hitEnter. You can use arrow keys orCtrl+JandCtrlKto navigate between suggested file list.
Source: https://github.com/kien/ctrlp.vim.
-
Open previously edited file in vim
You can open previous location by hitting
Ctrl-O. You can prefix the command with a number to go multiple files back. You can also travel forward in “file history” by usingCtrl-I.There’s a nice article on Vim Wikia with more details on a subject.
-
Old file version in split with vim
If you use git VCS, you can view previous version of the file you are currently editing in a split window by executing following command:
:vsp tmp | read !git show HEAD^:path/from/working/directoryFor the instant syntax highlighting, you can specify temporary file’s extension, like following:
:vsp tmp.py | read !git show HEAD^:lib/module.pyYou can also cycle back by few versions by replacing
HEAD^(which points to the previous commit) withHEAD~N, whereNis the number of commits you would like to go back in history by. For example, if you would like to get a version of the file 4 commits ago - you can do so by executing following command::vsp tmp | read !git show HEAD~4:path/from/working/directoryIt’s a pretty nice hack when you need to quickly view previous version of the file you are working on.
-
Pasting with vim and indentation issues
If you use vim often - you probably had to paste something into vim from the outside source. And, if you have corresponding indentation rules, they will get applied, turning your nice block of code into something that looks more like a case of stairs:
def foo(a, b):
        a, b = b, a
            print "I am doing something important."
                return a - b
Quite nasty, isn’t it? But that’s where vim’s
pasteoption comes in. Before pasting, execute:set paste. If you go into insert mode, you’ll see the usual mode indicator switch to-- INSERT (paste) --. Try pasting the same block of code now:def foo(a, b): a, b = b, a print "I am doing something important." return a - bBeautiful. Don’t forget to switch back to a regular mode by executing
:set
nopaste
. -
Use vimdiff as git mergetool
Using vimdiff as a git mergetool can be pretty confusing - multiple windows and little explanation. This is a short tutorial which explains basic usage, and what the LOCAL, BASE, and REMOTE keywords mean. This implies that you have at least a little bit of basic vim knowledge (how to move, save, and switch between split windows). If you don’t, there’s a short article for you: Using vim for writing code. Some basic understanding of git and branching is required as well, obviously.
Git config
Prior to doing anything, you need to know how to set vimdiff as a git mergetool. That being said:
git config merge.tool vimdiff
git config merge.conflictstyle diff3
git config mergetool.prompt false
This will set git as the default merge tool, will display a common ancestor while merging, and will disable the prompt to open the vimdiff.
Creating merge conflict
Let’s create a test situation. You are free to skip this part or you can work along with the tutorial.
mkdir zoo
cd zoo
git init
vi animals.txt
Let’s add some animals:
cat
dog
octopus
octocat
Save the file.
git add animals.txt
git commit -m "Initial commit"
git branch octodog
git checkout octodog
vi animals.txt  # let's change octopus to octodog
git add animals.txt
git commit -m "Replace octopus with an octodog"
git checkout master
vi animals.txt  # let's change octopus to octoman
git add animals.txt
git commit -m "Replace octopus with an octoman"
git merge octodog  # merge octodog into master
That’s where we get a merge error:
Auto-merging animals.txt
CONFLICT (content): Merge conflict in animals.txt
Automatic merge failed; fix conflicts and then commit the result.
Resolving merge conflict with vimdiff
Let’s resolve the conflict:
git mergetool
This looks terrifying at first, but let me explain what is going on.
From left to right, top to the bottom:
LOCAL– this is file from the current branchBASE– common ancestor, how file looked before both changesREMOTE– file you are merging into your branchMERGED– merge result, this is what gets saved in the repoLet’s assume that we want to keep the “octodog” change (from REMOTE). For that, move to the MERGED file (
Ctrl + w, j), move your cursor to a merge conflict area and then::diffget REThis gets the corresponding change from REMOTE and puts it in MERGED file. You can also:
:diffg RE  " get from REMOTE
:diffg BA  " get from BASE
:diffg LO  " get from LOCAL
Save the file and quit (a fast way to write and quit multiple files is
:wqa).Run
git commitand you are all set!If you’d like to get even better about using Vim, I wrote a book about it: Mastering Vim. I’m pretty proud of how it turned out, and I hope you like it too.
-
Colorless week results
A round-up of The Week Without Colorful Prompt.
I worked with the colors disabled in bash, git, and vim for a week. So how did it go? It is definitely an interesting experience, but such a harsh change that it doesn’t really work out with everything.
Bash
Disabling colorful PS1 and removing color output for ls commands forced me to concentrate more on the actual text, changing the perception of the general bash workflow. I was more concentrated on the task, missed less details, and generally paid more attention to the output.
Git
Never repeat my mistake by disabling colors for git diff. Log and status are fairly easy to read, but the disabling of colors noticeably slows down the workflow.
Vim
Vim without code highlight forces you to remember your code structure more effectively, which is a great thing. Not having a need to rely on color can hint that a programmer has better understanding of the code he/she is writing.
Now that the experiment is over I have mostly returned to using colorful prompt. But I do turn syntax highlight off once in a while - it allows you to see problems from new angle and work more efficiently at finding a solution. Try it and see for yourself!
-
A week without colorful prompt
I noticed that I rely on colors in the bash terminal a lot, as in git output, diffs, directory and file listings… It gets worse when using vim - I feel lost without the cozy syntax highlight guidance.
Time to stop using output colors for a week whether in shell, git, or vim, and use only plain text with no fancy colors. Set git config –global color.ui false and don’t use –color flags in shell. Also, set syntax off and set a simple color scheme for vim.
What can I gain from all this? It will definitely reduce my productivity for a few days. However, I have a hint of an idea that changing the visual code representation will give me new insight on what I am currently writing.
Link to related commit on GutHub.
Check back in a week to see how it went!
-
Editing bash command in vim
You can open the current command you are typing for editing in your default text editor by pressing
Ctrl + x + e. It will be executed after you write and quit the file. This is perfect for editing long/multi-line commands where typos are likely to occur. Consider something like this:for run in {1..10} do echo "Print me ten times" doneEditing this in vim is much more satisfying, isn’t it?
You can also open the last executed command for editing if you execute the
fccommand. You can also edit the last command starting with a certain pattern usingfc [pattern](you can skip the editor and execute the output offcby adding the-soption, and a useful tip is to havealias r="fc -s", which would allow you to execute the last command starting with “cc” by runningr cc).P.S: In order for this trick to open
vimand not any other editor, make sure you have the lineEDITOR=vimin your~/.bashrc. Obviously this works with any text editor. -
Vim, pathogen and git submodules
This is a step by step tutorial on how to organize your vim config files using git, pathogen, and git submodules. This tutorial assumes that you are familiar with git basics, but you don’t really need to understand every step in order to follow it. For simplicity, only
.vimdirectory is a repository in this example. You may want to have all your dotfiles under version control and use a script to symlink files to the home directory. For example see https://github.com/ruslanosipov/dotfiles.Setting up
Let’s assume your
.vimdirectory is a mess and is not under revision control. Let’s initialize a repository.cd ~/.vim git init git remote add origin git@github.com:user/project.gitNow let’s create
.vim/bundledirectory and clonepathogenplugin as a submodule.mkdir bundle cd bundle git submodule add git@github.cfm:tpope/vim-pathogen.git bundle/vim-pathogenPre-pend the following code to your
~/.vimrcto load pathogen from non-default directory:runtime bundle/vim-pathogen/autoload/pathogen.vim execute pathogen#infect()Let’s add some more plugins as git submodules, for example:
git submodule add git@github.com:Lokaltog/vim-easymotion.git
bundle/vim-easymotion
Now we can add and commit everything and push it to a repository.
git add .
git commit -m "Use pathogen to keep track of vim plugins"
git push origin master
Deploying
Assuming that your repository is located at
git@github.com:user/project.git:cd ~ git clone git@github.com:user/project.git .vimAnd you are done, all plugins are downloaded from their repositories now.
Maintaining
Git submodules keep track of specific commits and are not being automatically updated when target repositories have new commits. In order to update plugins you have:
cd ~/.vim
git submodule foreach git pull
git add bundle
git commit -m "Updated all the plugins in a bundle"
git push origin master
You probably want to make sure that new versions of plugins are compatible with each other before committing, however.
-
Vim movement cheatsheet

I had this lying around for a while now. This is great vim movement commands cheat sheet made by Ted Naleid (link to the original post). It does an amazing job aiding in the memorization of essential vim movement shortcuts.
-
Read man pages from vim
I recently discovered an incredibly useful function - you can look up man pages for keywords by pressing
K(read:Shift + k) in normal mode when cursor is over the word you need to look up.It works with any shell or programming language keywords, as long as vim recognizes the filetype.
-
Use vim commands in a browser
I’ve been giving preference to a keyboard over mouse since I discovered vim for myself, as it’s a faster and more convenient way to go. I am a Chrome user and recently I found an amazing plugin: Vimium.
It does exactly what the name suggests, allowing you to use vim-like commands in your browser. You can freely move, switch between tabs, work with forms and click links using familiar vim key bindings.
A two minute long introductory video explains basic commands and you’re all set! I’ve been using Vimium for over a week now, an amusing experience which allows you to throw your mouse in a dark corner (well, not exactly: Vimium still has some issues with over-bloated ajax pages, not to mention Flash and other nasty stuff).
Check it out: http://vimium.github.com/.
-
Extendedly basic vim setup
Ahoy Internet, here’s a neat and fairly simple vim configuration for programming. Feel free to copy over settings/plugins you find useful, or just download a repository from GitHub with settings and plugins.
The .vimrc file
"""""""""""""""""""""""""""""""""""""""
" => Editing
"""""""""""""""""""""""""""""""""""""""

syntax on

" Indentation settings
set tabstop=4
set shiftwidth=4
set smartindent
set autoindent
set expandtab

" Disable backups and .swp files
set nobackup
set nowritebackup
set noswapfile

" Ignore case when searching
set ignorecase
set smartcase

"""""""""""""""""""""""""""""""""""""""
" => Looks
"""""""""""""""""""""""""""""""""""""""

colorscheme darkburn
set background=dark

" Set terminal window title
set title

" Shorten press ENTER to continue messages
set shortmess=atI

" Show last command
set showcmd

" Highlight cursor line
set cursorline

" Ruler (line, column and % at the right bottom)
set ruler

" Enable wild menu (tab command autocompletion)
set wildmenu
set wildmode=list:longest,full

" Warn if exceed 80 columns limit
if (&ft == 'python')
    highlight OverLength ctermbg=red ctermfg=white guibg=#592929
    match OverLength /%81v.+/
endif

"""""""""""""""""""""""""""""""""""""""
" => Misc
"""""""""""""""""""""""""""""""""""""""

" Use Unix as the standart file type
set ffs=unix,dos,mac

" Enable filetype plugins
filetype plugin on
filetype indent on

" Ignore compiled files
set wildignore=*.o,*~,*.pyc,*.pyo

"""""""""""""""""""""""""""""""""""""""
" => Plugins
"""""""""""""""""""""""""""""""""""""""

" EasyMotion: one leader key instead of two
let g:EasyMotion_leader_key = '<Leader>'

" NERDTree: auto open and close
autocmd VimEnter * NERDTree
autocmd WinEnter * call s:CloseIfOnlyNerdTreeLeft()

" NERDTree: focus on text window (left)
autocmd VimEnter * wincmd l
autocmd BufNew * wincmd l

" NERDTree: auto close if last window
function! s:CloseIfOnlyNerdTreeLeft()
    if exists("t:NERDTreeBufName")
        if bufwinnr(t:NERDTreeBufName) != -1
            if winnr("$") == 1
                q
            endif
        endif
    endif
endfunction

" Exuberant Ctags: autogenerate on py file write
au BufWritePost *.py silent! !ctags -R &

" Pydoc: open in new tab instead of split
let g:pydoc_open_cmd = 'tabnew'

" Pydoc: disable search term highlight
let g:pydoc_highlight=0
Plugins
If you are not planning to use some of the plugins, make sure to remove plugin-specific rules from .vimrc => Plugins.
- Exuberant Ctags: allows you to generate index of variables, functions and classes to freely move between them. A bit more info on how to use these in article Using vim for writing code.
- Colo(u)r Sampler Pack is not really a plugin, but a collection of color shemes. 100 of them, to be precise. Feel free to choose whatever you like.
- ScrollColors allows you to try out every theme in visual mode. Just type
in
:SCROLL. - EasyMotion allows you to move between words, lines and sentences with a
lightning speed. Just hit
<Leader> + wto jump to one of the words forward or<Leader> + bbackward (leader key is a backslash by default). It can do more neat things, documentation is pretty self-explanatory. - NERDTree is a directory tree, like in all modern IDEs (but of course better).
- tComment allows you to easily comment out blocks of code. Hit
gccto comment a line orgcwhile selecting a block inVisual mode.
Source
You may want to head over to GitHub and grab a version from here: https://github.com/ruslanosipov/dotfiles.
-
Using vim for writing code
Vim is a great text editor which can be much more powerful then any GUI editor or IDE. It has its learning curve, but once you are used to it you’ll never want to switch to anything else. Here’s a quick tutorial on how to use and customize vim for working with code.
Basics
Feel free to skip this first part if you are familiar with vim already.
First, let’s get the hang of moving around. You can use arrow keys or
h,j,kandlto move around. HoldingCtrlwhile moving will allow you to move between words (separated by spaces, tabulation, or line breaks), holdingShiftallows you to do so with all punctuation characters including spaces and line breaks.Typing
:147will get you to the line 147,/foowill get you to the first occurrence of foo,/will repeat the last search.Hit
ito enter insert mode and type in text. HitEscto go back. Keyadoes the same thing, but sets the cursor after the selected character. HitInsertto switch between insert and replace modes.Typing in
:wwill write changes to a file,:qexits the editor, `:e` opens another file. Sometimes you need to do some copy-pasting: copy (yank) line with `Y` and paste it with `p`. You should know that vim allows you to prefix the majority of commands with a number: typing in `13Y` will yank 13 lines, `40j` will take you 40 lines down, etc. Command `x` will delete a character, `dd` will delete a whole line. Of course, you can prefix it with a number if you need to delete more then one line. `:%s/foo/bar` will find and replace the first occurrence of foo with bar, `:%s/foo/bar/g` will do so within the whole file. Splitting windows is very helpful tool: `:split ` will split the window horizontally, `:vsplit ` will do so vertically. Hit `Ctrl + w`, and then arrow key will select an active view, `Ctrl + w, r` will swap the views. Simply type `:q` to close the window. ## Customizing Here's example of a `~/.vimrc` file, and the basic options necessary for editing code with vim. syntax on set tabstop=4 set shiftwidth=4 set smartindent set autoindent set expandtab Option `syntax on` enables syntax highlight, `tabstop` sets tab width, `shiftwidth` sets tab width for auto indentation, `smartindent`, `autoindent` enables indentation (smart indentation implies adding an extra indentation level after defining function, starting a loop, etc.), optional is `expandtab`, which tells vim to treat all tabs as spaces. If you are fan of limiting line width with n columns - add option `colorcolumn=80`, or (if your vim version is below 7.3) add the following lines: highlight OverLength ctermbg=red ctermfg=white guibg=#592929 match OverLength /%80v.+/ That should highlight all text exceeding the 80 columns limit. Feel free to experiment with the options and start building up your own `.vimrc`. ## Using ctags with vim [Exuberant Ctags](http://ctags.sourceforge.net/) allows you to create "tags" for all your classes, functions, and variables to allow easily jumping between them. After installing ctags (package is also available in major repositories named `ctags`) generate tags: $ cd project/ $ ctags -R * Open the main project file and move your cursor over to some function call. Hit `Ctrl + ]` to move to function definition, `:tn` will move you to the next definition for the function. Hitting `Ctrl + t` will return you back. Auto completion allows you not to bother with finishing words, variable or function names, and pretty much anything. That being said, `Ctrl + n` will finish the word for you or allow you to select the desired word from the list. This is just a basic example of what you can do with vim, for further info you can read [vim documentation](http://www.vim.org/docs.php). I may be posting some more tips and tricks on using vim in future.